 Adobe Community

Copy link to clipboard
Copied
I am working on a MacBooPro OS 10.6.8 with InDesign CS5.
I have laid out a 257 page book in 6" x 9" format with facing pages. Some of the pages have full-bleed graphics so I set the bleed of all edges at 0.125" (1/8"). When I make a PDF of the layout, however, the inner margin is strange. Instead of having a proper bleed, some of the facing page gets assigned to the page. (see attached images).
Am I doing something wrong? How can a full-bleed book be set up so that each individual page has a bleed in the gutter, rather that a portion of the neighboring page?
Marc


 1 Correct answer

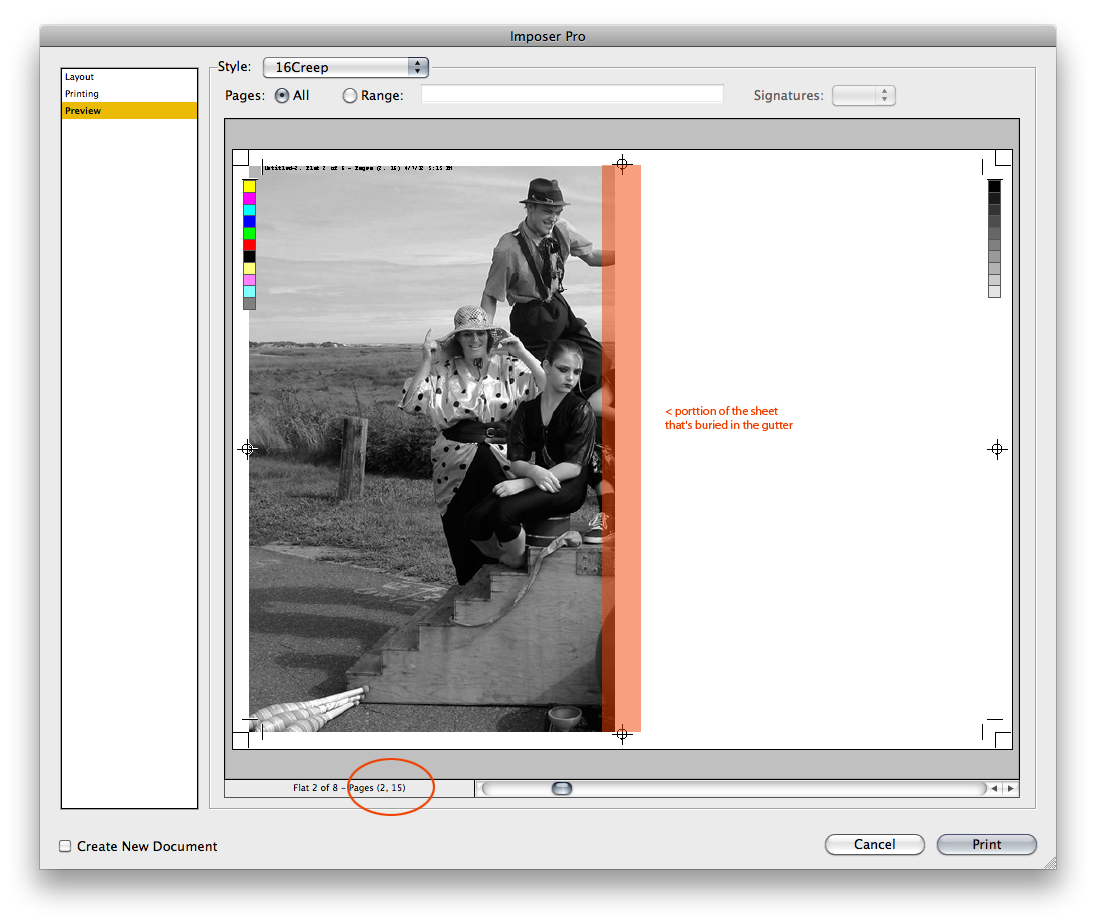
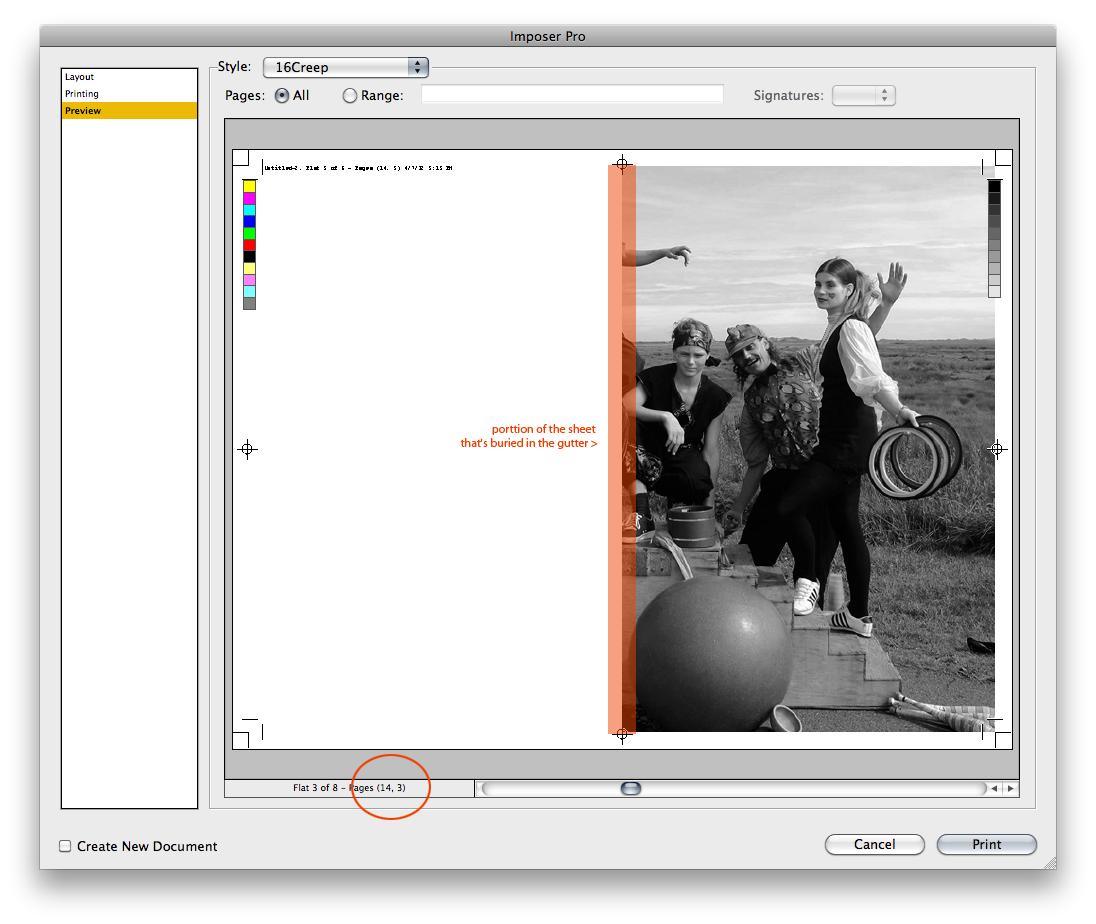
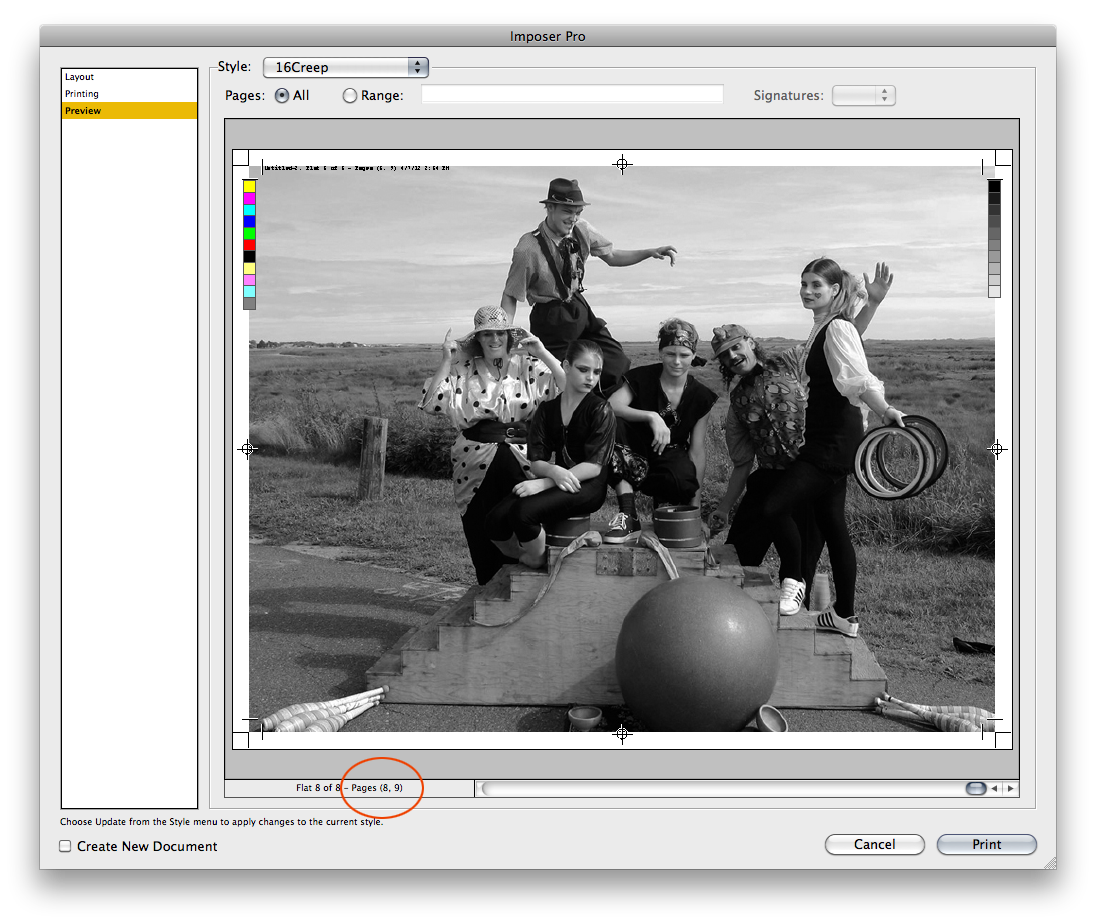
This might help with imposition and objects that hit the gutter and why you don't need to make adjustments in your pagelayout or worry about inside bleeds. These are from the simplest 16 page imposition out of ImposerPro where I've exaggerated the amount of creep Imposer will apply. You can see what happens to the same crossover image on 2-3 vs. 8-9:
 28
Replies
28
28
Replies
28
Copy link to clipboard
Copied
That's exacly what is supposed to happen. Bleed at the gutter is on the opposite page unless you split the spread and extend the art.
See InDesignSecrets » Blog Archive » Breaking Pages Apart to Bleed Off a Spine
Copy link to clipboard
Copied
Hello Peter.
How does one "split the spread"? (I know how to extend the art)
If I de-toggle "facing pages" I know I can get the bleed line all around the page but I lose the ability to have, for instance, automatic left and right page numbers.
Is there a way I can take a 257 page book that is already laid out and split the spreads without having to rework the book from scratch?
Thanks for your help.
Marc
Copy link to clipboard
Copied
Look at the link Peter gave you. It's very easy to do.
Copy link to clipboard
Copied
How's the book being bound? Unless it's something like a wire-o where there's an exposed inner trim you don't need an inner bleed.

Copy link to clipboard
Copied
Peter,
Is there any other solution besides the one given here for adding bleeds to a gutter when the Indesign document is set up in spreads? I've read the InDesign secrets tip and it is helpful, but I'm still in a jam. I am deep into the design of a wiro-bound reference book that is over 400 pages. I am creating it in sections to eventually gather the section files into an InDesign book. They all have the same sets of master pages.
There are many spreads with the same full-page left-hand background texture art that will need to bleed into the gutter. When I extend the art box frame to add gutter bleed the art is overlapping onto the right hand page after I break the pages apart. btw, the Harb script didn't work for me. For the most part it did, but the folios get moved around, so I will be peeling all 200+ spreads apart by hand. That is not great, but possible to do. However, I want to give the printer a sheet with bleed on all four sides. Is this impossible? I've never worried about gutter bleed when doing magazine design; never a problem. I set this job up as spreads for easy review by the client and design convenience. Ha!
The prepress dept. first told me this would not be a problem. But then they talked to their pressmen who said, yes we want bleed! InDesign can do so many gee whiz things, I never suspected that it couldn't handle this. Too late to turn around now. Many weeks of work invested.
thanks for any help,
Dory
Copy link to clipboard
Copied
Actually, rather than set an Inside Bleed on a project like that I usually make the page size larger by the bleed amount, add the same to the inside margin, and add a manual trim marker, as long as there is nothing that crosses the spine.
Copy link to clipboard
Copied
Thank you. Too late now, but at least I am aware of the InDesign limitations.  I appreciate the help.
Copy link to clipboard
Copied
InDesign can do so many gee whiz things, I never suspected that it couldn't handle this
I don't think it's possible. If you have an image that stops at the gutter how would Indesign know what to bleed?
Peter's right the best way to handle wire-O is build the bleed into the document from the start. If you have crossovers you'll need to duplicate the image frame and offset left and right.
If your inside margins are generous enough and there are no crossovers, the easiest solution might be to change the trim size rather than trying to resize the doc.
Copy link to clipboard
Copied
Thank you to everyone for all your comments. I was able to use the technique Peter linked to in order to get bleeds on the inner margin for those pages with full-bleed graphics.
Honestly, however, I am stunned that InDesign, which is supposed to be made for laying out books, wouldn't automatically separate facing pages when bleeds are selected so that designers can see their work in a two-up facing pages presentation AND also get bleeds on all sides. This seems like a basic procedure. How on earth could you lay out a full color magazine with full-bleed graphics on every page without that feature?
Copy link to clipboard
Copied
Most of the time, even with full bleed graphics, you don't need the bleed at the spine, and if the images cross the spine you don't need to split a spread since the crossover becomes its own bleed. I't only in situations like your initial illustration that there is a problem that requires a split.
While I can understand your desire to have the inside bleed show in the spread, that is only useful for your case of two different images bleeding at the spine, and it would mean you woould need to place crossovers twice and calculate the correct positioning to allow for that stripe down the center of your layout that is not visible in the finished publication.
Copy link to clipboard
Copied
How on earth could you lay out a full color magazine with full-bleed graphics on every page without that feature?
A magazine would be either saddle stitched or perfect bound, in both cases there's no need for an inside bleed. When the magazine is imposed at the printer some amount of creep will be applied to accommodate where the page meets the binding. Even if the creep amount is off you won't see a meaningful problem unless you break open the binding. In the case of a binding like wire-o where the inside trim is exposed you might need an inside bleed, and in that case the best approach is to build the bleed into the page.
Copy link to clipboard
Copied
Thanks again for all the answers and suggestions.
My problem is that I am uploading the file to an online publisher. Their automated system needs to have a full bleed around each page (including the spine) or it will not accept the PDF.
Still, it seems like it would be so easy and helpful to have ID arranged so that when an inner margin bleed is selected in Document Setup for a facing pages arrangement, the facing pages slide apart enough to show the red bleed line go all around the pages. That way you could see your layout as the reader would (two-up) and also work with the bleed.
Anyway, one for the wish list.
Marc
Copy link to clipboard
Copied
Their automated system needs to have a full bleed around each page (including the spine) or it will not accept the PDF.
There's no reason why you can't include the inside bleed you are showing in post 1. If the magazine is correctly imposed you won't see any problems in the gutter—the bleeds will be buried in the binding or eliminated.
They want the bleed for crossover images where creep is an issue—i.e. a crossover on pages 2 and 3 of a 16 page signature where the imposition might pull the two sides of the crossing image away from the spine to allow for paper creep. If a crossover is in the center of the signature (8 and 9) the imposition software would eliminate the bleed and butt the two pages together on the spine (there's no creep at the center spread).
Copy link to clipboard
Copied
This might help with imposition and objects that hit the gutter and why you don't need to make adjustments in your pagelayout or worry about inside bleeds. These are from the simplest 16 page imposition out of ImposerPro where I've exaggerated the amount of creep Imposer will apply. You can see what happens to the same crossover image on 2-3 vs. 8-9:


Copy link to clipboard
Copied
Thanks again for all the very clear info.
What I still don't understand is that, in a situation like mine (examples at top of thread) where I have a full bleed graphic on one page and text only on the facing page, when I make a PDF from the facing pages layout, I get a thin strip of white on the spine edge of the graphic page, and a thin strip of the graphic on the spine edge of the text only page. If the trimming is done slightly off by mistake, these will show (albiet not much because they're in the gutter).
What I would prefer in the spine edge bleed is to have an extra 1/8" of white on the text only page, and an 1/8 of extra graphic on the graphic page. I would get this is the book were laid out "staggered" but then I can't see the two-up images of each spread.
Marc
Copy link to clipboard
Copied
If the trimming is done slightly off by mistake, these will show (albiet not much because they're in the gutter).
For a typical magazine binding there would be no trim on the inside edge, the pages are imposed on the press sheet so it can be folded—all of the inside edges would lie on a fold.
If the imposition doesn't allow for any paper creep the bleed would be eliminated during imposition because the inside trim (not the bleed) is aligned on the fold. For large signatures not allowing for creep will create a problem aligning objects positioned near the outer trim—in my example pages 8 and 9 are the inside spread and get pushed outward by the paper thickness when the signature is folded.
If the imposition does allow for creep, the pages are incrementally pulled away from the spine depending on where they are in the signature–in my example 2-3 are pulled the furthest while 8-9 are not moved at all. Unless the paper creep amount is set too high, you'll never see the inside bleeds because the binding hides the creep amount.
Copy link to clipboard
Copied
mpkadobe wrote:
What I would prefer in the spine edge bleed is to have an extra 1/8" of white on the text only page, and an 1/8 of extra graphic on the graphic page. I would get this is the book were laid out "staggered" but then I can't see the two-up images of each spread.
I'm not sure where you think that extra 1/8" is going to come from. It doesn't exist in the current layout (well, it does, but it's the first 1/8" on the opposite page). Are you saying you want there to be a 1/4" gap and you will fill it with what you expect to bleed? Frankly, I would lay out in reader's spreads without the bleed so you get a true picture of what the reader will see (that gap can be very deceiving in terms of evaluating margins), then, and only as the very last step, split only those spreads that need it and extend the frames along the spine (or if you insist on having bleed on all adges of all pages, run the split spreads script Harbs wrote).
If you want to see that gutter, though, do what Rob suggested earlier: make the pages wider by 1/8". I'd add a slug top and bottom so you can make a note for the printer for where to trim, set the inside bleed to 0, and add a manual trim guide to denote the inside edge of the page and manual trim marks for the inside edges. Export using the document bleed setting and include the slug.
Copy link to clipboard
Copied
Thank you so much everyone for all you lengthly and careful answers.
I see my mistake was in thinking I needed a bleed on the inner margin (spine edge) for a perfect bound book, which would be trimmed for alignment before the cover goes on, but now I see that is not the case and bleeds are only required on the top bottom and outside edges.
I'm good to go.
Thanks again for your help.
Marc
Copy link to clipboard
Copied
If you want to see that gutter, though, do what Rob suggested earlier: make the pages wider by 1/8". I'd add a slug top and bottom so you can make a note for the printer for where to trim, set the inside bleed to 0, and add a manual trim guide to denote the inside edge of the page and manual trim marks for the inside edges. Export using the document bleed setting and include the slug.
I think manually adding an inside bleed for saddle stitch or perfect binding would potentially cause confusion at the printer as to what the actual trim size of the magazine is, particularly with an online printer where there's little or no communication. I've worked on hundreds of books and magazines with full page bleeds and crossovers and have never added a manual bleed or split pages—it's just not a problem when there are folded and gathered signatures. Wire-O is different, but even then I simply avoid designs where a photo or box stops at the gutter.
Copy link to clipboard
Copied
I might add some bleed for perfect binding knowing it will never likely show unless the binding gets broken, but essentially I don't disagree at all, especially about the potential for miscommunication.

Copy link to clipboard
Copied
I, too am amazed at how jerry-rigged the "solution" here seems. This should be a basic feature. Of COURSE we want to design in 2-up layout. I vaguely remember having to do this in PageMaker back in the 90s and there was a way to assign the images to each page so that the bleeds would show up the correct way. Thought I'd come here and see a "push this button and you're done" type of answer. This is nuts!

Copy link to clipboard
Copied
This is an eight-year-old thread, please start a new thread and indicate your InDesign version and OS and your issue.
Copy link to clipboard
Copied
Also, when you start a new thread indicate how the facing page book will be bound.

Copy link to clipboard
Copied
Hi! I really need help. I m new into Indesign, and I try to format my book, but I'm a lil bit confused about the bleeding. When I upload my manuscript on Amazon KDP, they said it's ready to print. But I'm concerned about the interior bleed. Is this correct? I attached a picture below, one from my Indesign and one from amazon. Is the middle part correct? I don't want that line to be visible on printing. The last one is from PDF ready to print.


-
- 1
- 2

 AdChoices