 Adobe Community
- Home
- Photoshop ecosystem
- Discussions
- Refine edge tool not erasing the background
- Refine edge tool not erasing the background

Copy link to clipboard
Copied
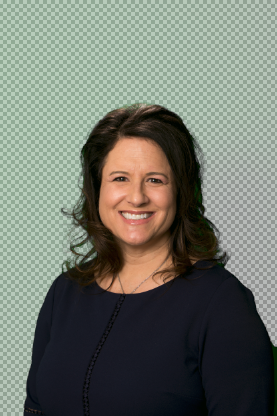
When I take this image into "select and mask", it selects everything ok but when I try to erase the black shadows on the left from the background with the "refine edge" tool, it does absolutely nothing! What am I missing here??


 1 Correct answer

Hi
I did the following :
1. Opened select and mask and clicked select subject

2. Went to the select refine edge tool and used a small brush (35px 100% hardness 1% spacing smart radius off) to work round the hair edges (using J to check which edges are being refined)

3. I output to new layer with layer mask and did not check decontaminate colours
4. I added a new layer above the masked layer - clipped it to the masked layer and set blending mode to color
5. I used a soft brush , picking up color from t
Explore related tutorials & articles
 10
Replies
10
10
Replies
10

Copy link to clipboard
Copied
The background is too similar in color to the subject. Refine edge is struggling to define where the subject’s edge is. You will have to paint this section manually. The third tool down in select and mask is a regular brush. You can paint over the background with the brush set to minus, and that will erase the background.
Copy link to clipboard
Copied
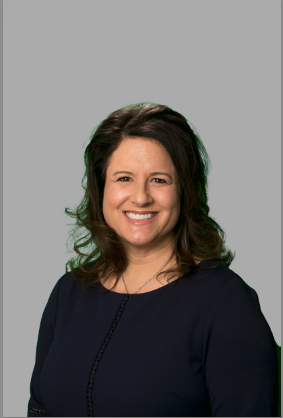
With that tool, it would be impossible to get the hair looking natural, since it's transparent in areas. I am enclosing another photo with the original green screen showing. I can't select and mask this one either. What am I missing here? This should be easy with the newest refine edge tool in cc!!!!


Copy link to clipboard
Copied
It sounds like you are using the wrong approach. The easiest way to do this is by first selecting the woman with the Quick Selection brush. Then go into 'Select and Mask' and expand the selection to include the hair. It took me less than two minutes to get this:

Copy link to clipboard
Copied
Hi and thank you for the reply. I think this is how I'm doing it in
Photoshop cc. There are 3 brushes. I use the first one to select and then
the 2nd to refine. Also, the image you showed me is still within the mask
area (and the hair still has a lot of green still in it). Mine looks good
there too until I click out of it and the hair looks choppy and
transparent. How does your version look when you click "ok" and can see it
in photoshop?
Copy link to clipboard
Copied
Hi
I did the following :
1. Opened select and mask and clicked select subject

2. Went to the select refine edge tool and used a small brush (35px 100% hardness 1% spacing smart radius off) to work round the hair edges (using J to check which edges are being refined)


3. I output to new layer with layer mask and did not check decontaminate colours

4. I added a new layer above the masked layer - clipped it to the masked layer and set blending mode to color
5. I used a soft brush , picking up color from the hair and brushing round the edges to remove any green contamination

Dave
Copy link to clipboard
Copied
Hi and thanks for your detailed reply. This looks pretty good overall, but
the area of the hair on her right shoulder ended up being blocked up a bit
instead of showing the transparent areas (originally green). It looks like
you put this on a grey background. My output would actually be on a
transparent background and saved as a png for compositing
Copy link to clipboard
Copied
You can put it on any background. I usually mask against a similar background as the intended use, as I would finish differently for use on black as I would on white. Fine hair is semi transparent. The transparency checkerboard is not ideal as it hides some details. Once done just turn off the plane background.
Dave
Copy link to clipboard
Copied
What you did seems to work pretty well, but that sure seems like a lot of painstaking hoops to jump through that should otherwise be a simple process. Here's a video from You Tube that shows Scott Kelby doing it with a large brush in just a few seconds. How to Mask Hair Using Photoshop's New "Select and Mask" Feature - YouTube
Why is my image so difficult to separate? I thought the refine edge was supposed to be so great in cc!
Copy link to clipboard
Copied
Hi
For most of those tutorial videos the starting images are carefully chosen. Look at his image in that video - dark hair - good contrasting light background all around the hair - no real low contrast areas. Also the background, being neutral toned, is not one which will leave colour contamination. You could mask that with a channel adjustment.
Remember colour contamination is not in the mask it is colour in the wanted areas of hair - due to reflection, transparency and on the very edge and finest hair due to the way the colour demosaicing process works in taking the raw data from the camera sensor into an RGB image.
Dave
Copy link to clipboard
Copied
Yes, I suspected that as well. The photoshop "gurus" make it look so easy by stacking the deck beforehand.

 AdChoices