 Adobe Community
- Home
- Lightroom Classic
- Discussions
- Change Color of Currently White Background
- Change Color of Currently White Background

Copy link to clipboard
Copied
I have an image which I used Lens Correction and Manual to change the scale of the picture. This has resulted in a white background behind the image.
What I would like to do is change that white background to perhaps black, or a dark grey. I cannot figure out if I can do this.
By way of background, this is why I want to do what I did. My sister took an image that she asked me to get printed on metal for her. Unfortunately, the original image aspect ratio is 4x3, and I haven't found any local company that will do a metal print with that aspect ratio. I cannot easily crop the image to get a more standard aspect ratio like 4x6 without cutting out parts of the image I want left in. The image was shot pretty tightly. So what I did was to actually crop it to a 4x6 and then use the Lens Correction/Manual/Scale change to get the original image in full, but with the resultant white background which I would like to change to perhaps black.
Hope that makes sense.


 1 Correct answer

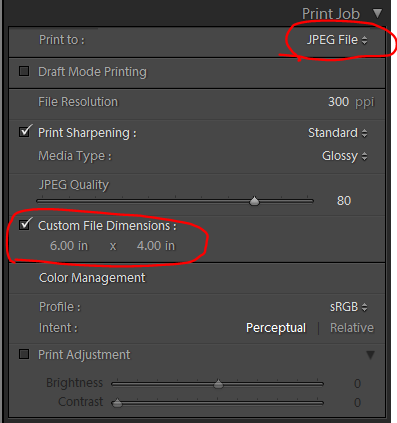
You can do this in the Print module. Remove the crop from the image file so it is back to its original 4:3 aspect ratio. In the Print module's Template browser (left side) select '(1) 4x6.' On the right side panel at the bottom enter these settings:
Then apply the following settings:

 6
Replies
6
6
Replies
6
Copy link to clipboard
Copied
You can do this in the Print module. Remove the crop from the image file so it is back to its original 4:3 aspect ratio. In the Print module's Template browser (left side) select '(1) 4x6.' On the right side panel at the bottom enter these settings:

Then apply the following settings:

Copy link to clipboard
Copied
Thanks so much, Trshaner. That appears to have worked!
Copy link to clipboard
Copied
Glad to help. Keep in mind the 'Custom File Dimensions' and 'Cell' size' should reflect the actual print size. The dimensions I show are for a 4" x 6" print. If you were doing an 8" x 12" print (also 4x6 aspect ratio) enter that into the 'Custom File Dimensions' and 8" x 10.67" into the 'Cell' size.' The objective being to create an image file that is 300 ppi at the actual print size. For a metal print 'Glossy Standard' Print Sharpening is probably the best choice and most printers want sRGB JPEG files.
Copy link to clipboard
Copied
I've used LR ever since version 1.x and think I know a heck of a lot about it, but I actually have never used the Print module before...maybe fooled around with it a couple of times, but I'll have to look more into it to see what I've actually done with it to do this! I don't think I understand what that "Cell Size" is, so I'll have to look into it....although I take it that it's used to get that 300 ppi for the actual print size.
I've had metal prints done before and always have kind of wondered what sharpening to use....I think I've used the Glossy Standard, as you have suggest, but thanks for clarifying that. I've always just used the Export function to produce the final file to print.
Thanks so much, once again....I really appreciate it!
Copy link to clipboard
Copied
Judge62 wrote:
I don't think I understand what that "Cell Size" is, so I'll have to look into it....although I take it that it's used to get that 300 ppi for the actual print size.
The 'Cell Size' is the size of the picture as laid out on the Background, which is the paper size defined by the 'Custom File Dimensions.' You can refer to the screenshots posted in reply #1. Use whatever dimensions and centering you want, which can be borders right and left as shown in reply #1 or borders right, left, top, and bottom using a smaller cell size as shown below. You can even add text to the background area using the Identity Plate Editor. Here are a number of videos on using the Print module: The Print Module « Julieanne Kost's Blog
You can also re-purpose these JPEG files for other uses such as Holiday emails and Web posts. For screen viewing change the Print Sharpening to Glossy Low, which is the least amount and very close to Screen Standard. Adjust the File Resolution to a value appropriate for screen viewing such as 6" x 4" 'Custom File Dimensions' and 300 ppi 'File Resolution (1800 x 1200 pixels) or even smaller. Enjoy!

Copy link to clipboard
Copied
Thanks once more for the info, Trshaner.
BTW, last night, I produced the final file to do an 8x12 metal print and uploaded the file to the photo lab I use. Hope to see the print in a day or so.

 AdChoices