 Adobe Community
Copy link to clipboard
Copied
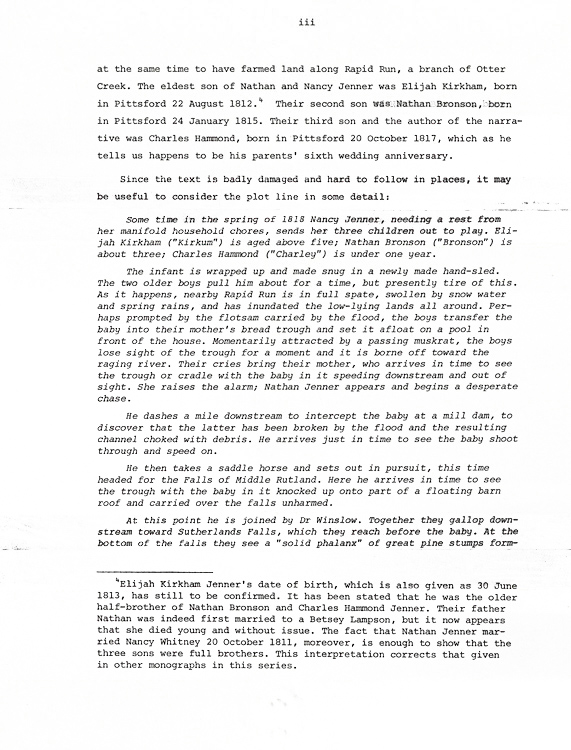
The attached photo is a raw scan of a page from 1970s word processing: paste together corrected paragraphs with mucilage glue. After 30-40 years the glue has turned brown.
How can I correct his in Lightroom? I'd like to minimize the browning due to the glue while retaining the quality of the typewritten text.
Since this is a raw scan in color, I can do almost anything to filter out the browning. But, my attempts haven't proven very successful.
Any suggestions would be greatly appreciated.

 1 Correct answer
To build on Bob's suggestion, you can remove most of the rest of the discoloration by setting Orange and Yellow Luminance to +100 and Saturation to -100:

And you can make the text a little more crisp by increasing Basic > Clarity to +25:
Copy link to clipboard
Copied
This was about 2 minutes in Lightroom using the masking brush with Auto Mask turned on and just increasing the exposure of the areas to turn them white. You could do a LOT better if you took more time and effort. The file is small and I think a large scan would work a lot better. I set the brush to MAXIMUM size and just had to do about 8 to 10 clicks to chose 4 areas.

Copy link to clipboard
Copied
Watch this video to see how ONE CLICK Auto Mask selection in Lightroom works. I use this technique a LOT.
Copy link to clipboard
Copied
To build on Bob's suggestion, you can remove most of the rest of the discoloration by setting Orange and Yellow Luminance to +100 and Saturation to -100:

And you can make the text a little more crisp by increasing Basic > Clarity to +25:
Copy link to clipboard
Copied
Wow! Fantastic!
You just have to be careful to select spots with all densities you want to eliminate.
I really need to learn Lightroom better. This is motivation. I had no idea you could do this!
Thanks again,
Dave
