 Adobe Community
- Home
- Photoshop ecosystem
- Discussions
- Merge nested group into one layer or one smart obj...
- Merge nested group into one layer or one smart obj...

Copy link to clipboard
Copied
PS CC 2017.1.1 x64, Windows.
I have 60+ objects inside my ps document. Each object is a simple assembly: small jpg image (cube) + layer mask (pixels), something like this:

I can put my objects under: A) single group, B) nested group tree, like this:


The result is identical, a simple array of objects over a solid, black layer:

Now I would like to merge my objects (multiple layers) into one layer (including layer masks). Here is what I get after merging (Merge Group or Convert To Smart Object command).
Case A. single group:
I am selecting all objects, right-click, Convert to smart object (or Merge Group). This converts my object (cubes) into one single object, layer masks are applied and everything looks identical to the original state (multiple objects, multiple layers). It looks perfect:


Case B. nested group:
Now, let’s do the same with the nested group. Now, my objects are nested under line 0 copy, line 1 copy, line 2 copy, line 3 copy which are nested under Group 8, Group 7, Group 6, Group 5, B. nested group. I am selecting the top most group inside the nested tree, right-click, Convert to smart object (or Merge Group). And surprise! The new layer (smart objects) differs from the original. Photoshop puts some extra mini-gaps between my objects:


And it seems that the width of those extra gaps depends on how many levels (nested group tree) are merged. For example, if I select Group 7, right-click, Convert to smart object (or Merge Group), I get this – some gaps have been added but its width is smaller:


It seems that Photoshop adds some ‘extras’ at each level of the nested group tree and the difference (in reference to the original state) could be really huge. The result is the same for both: Convert to smart object and Merge Group commands. I’ve also noticed similar behaviour while working with adjustment layers. It does matter whether I apply my adjustment layer to the single or nested group. Each level of nested tree seems to add some tiny modifications and the final results could be different.
Did someone experience the same? is there any workaround to this? As for now the only solution I see is to merge my objects manually, step by step, starting from the very bottom of my nested tree. Or I can write a script. But maybe I am missing something and this can be easily fixed by setting some variables/preferences.
Thank you.


 1 Correct answer
got it! It has been related to my Color Settings. Disabling Blend RGB Colors Using Gamma option solves this issue:
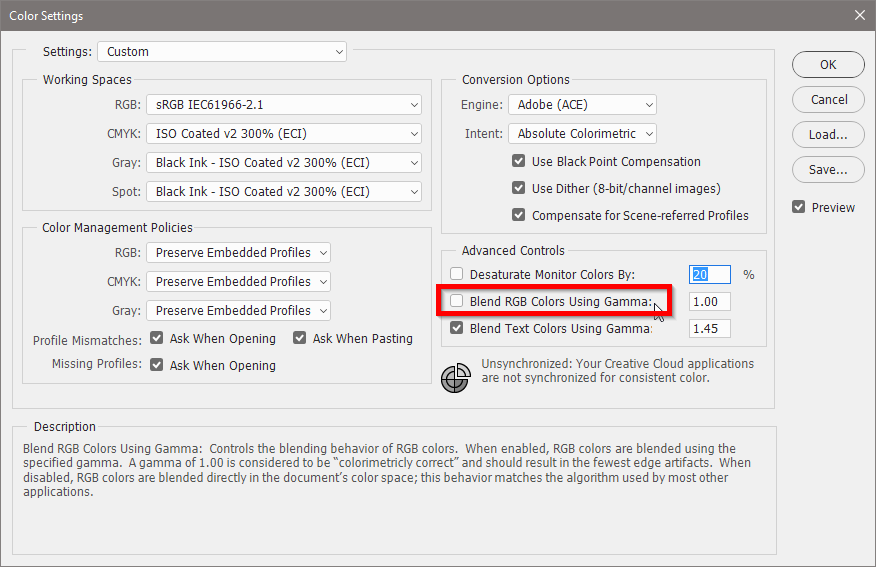
Just wondering whether this Blend RGB Colors option should work like this. I mean it shouldn't result in different output for different Layers tree configurations. It seems that Photoshop's Blend RGB Colors algorithm loops recursively through the nested layers tree and the overall effect quickly becomes magnified.
Explore related tutorials & articles
 24
Replies
24
24
Replies
24

Copy link to clipboard
Copied
Does this happen at View > 100%?
When you open the two SO are their contents identical or are the gaps in the second one »real«?
What are the Canvas Sizes of the two SOs when opened?
Copy link to clipboard
Copied
a. this happen at any %. this is not a 'display glitch'.

b. No. SOs are different. Single Group Merge (Left) vs Nested Group Merge (Right):

c. 1079px x 698px for both.
Copy link to clipboard
Copied
The two images appears to have different transparency, in the one case »anti-aliased« in the other sharp.
Are the Layer Masks actually different in the two SOs?
Copy link to clipboard
Copied
nope. that's the point. the only difference is that the left one has been produced by direct selecting of multiple objects under single group and the right one has been created from the nested group tree (6 levels) by selecting the top most group of the nested group. But in both cases I use the same base content: 60+ objects, the same arrange, the same scale. The only difference is its position in the Layers tree. If nested (in my case 6 levels deep) Photoshop produced those gaps (sharp). If everything under single group the result (merged layer/smart object) is equal to the original (anti-aliased).
Copy link to clipboard
Copied
Could you provide the file?
Copy link to clipboard
Copied
the file I am working on is too big. But since this issue seems to be related to the transparency % or anti-aliasing issue I’ve prepared a very simple test. A text object with the outer glow set (transparency %): Blend Mode: normal, Color: gradient with transparency. The text object is nested under Group 1 to 8. The result is:


Now, Select text object, right-click, convert to smart object. Result brighter than original:


Undo Changes. Now, Select Group 1, right-click, convert to smart object. Result brighter:


Undo Changes. Now, Select Group 2, right-click, convert to smart object. Result brighter:


Undo Changes. Now, Select Group 3, right-click, convert to smart object. Result brighter:


Undo Changes. Now, Select Group 4, right-click, convert to smart object. Result brighter:


Undo Changes. Now, Select Group 8, right-click, convert to smart object. Result brighter:


The *.psd file for testing: apply-layer-mask-vs-convert-to-smart-object_002.psd - Google Drive
Copy link to clipboard
Copied
Thanks.
Looks like an interesting issue but I cannot reproduce it with your file. (Adobe Photoshop Version: 2017.1.0 20170309.r.207 2017/03/09:23:00:00 CL 1107877 x64; Operating System: Mac OS 10.12.4)
Seems like a long-shot but does turning off »Use Graphics Processor« in the Performance Preferences (Photoshop > Preferences > Performance > Graphic Processor Settings) and restarting Photoshop have any bearing on the issue?
Copy link to clipboard
Copied
no. disabling the GPU usage doesn't solve this issue.
Your snapshots: if I select, for example Group 4 and right-click and hit convert to smart object my Layers tree changes, i.e. Groups 1 to 4 are merged into ONE Group 4 Smart Object. And all your snapshots have the same layer tree structures, all groups (Group 1 to 8) visible. I was expecting something like this:

Copy link to clipboard
Copied
Sorry, I mistakenly inserted identical screenshots multiple times … here another:

Copy link to clipboard
Copied
this looks good. seems like everything works fine under your ps installation. Anyway thanks for your help!
Copy link to clipboard
Copied
So far I could not help with this issue unfortunately …
What are your File Handling Preferences?
What have you done for all-purpose trouble-shooting so far?
https://helpx.adobe.com/photoshop/kb/basic-trouble-shooting-steps.html
Copy link to clipboard
Copied
my file handling preferences:

All apps up to date
GPU driver up to date (Nvidia Quadro K2000)
Windows 10 up to date
no missing tools
no plugins
user permissions - checked.
didn't try to restore preferences.
didn't try to launch in safe mode.
Copy link to clipboard
Copied
I did perform another test. I've created a simple text object with outer glow effect set (transparency %). Just like in previous example. This time the background layer is disabled. Now I am moving my text object between groups inside my Layers tree (from the very top to Group 8, 7, 6,... and finally Group 1). Here is what I see:


The *.psd file for testing: apply-layer-mask-vs-convert-to-smart-object_003.psd - Google Drive

Copy link to clipboard
Copied
Hi
Just to chip in
I have just tried this on my system and could not replicate the issue. Photoshop CC2017.1.1 on windows 10 using AMD7970 3GB graphics card
Dave
Copy link to clipboard
Copied
Thanks for your input, Dave
Copy link to clipboard
Copied
Have you tried restoring Preferences after making sure all customized presets like Actions, Patterns, Brushes etc. have been saved?
https://helpx.adobe.com/photoshop/kb/basic-trouble-shooting-steps.html
Copy link to clipboard
Copied
got it! It has been related to my Color Settings. Disabling Blend RGB Colors Using Gamma option solves this issue:

Just wondering whether this Blend RGB Colors option should work like this. I mean it shouldn't result in different output for different Layers tree configurations. It seems that Photoshop's Blend RGB Colors algorithm loops recursively through the nested layers tree and the overall effect quickly becomes magnified.
Copy link to clipboard
Copied
Might be worth bringing up over at
Copy link to clipboard
Copied
Thanks for coming back
That setting is not normally checked by default - hence we did not see the issue
Dave
Copy link to clipboard
Copied
But as I do not see why Group-depth should be affected by this I suspect this may be a bug or an unwanted feature …
Copy link to clipboard
Copied
I was out of the office when I posted the comment about the default. I am back in now and tested with Blend RGB colors at gamma 1.0 checked.
I could replicate this, with the option checked, but only where background was transparent (i.e. the checkerboard). Strange.
Dave
Copy link to clipboard
Copied
yes. it is strange.
Copy link to clipboard
Copied
nope. that's the point. the only difference is that the left one has been produced by direct selecting of multiple objects under single group and the right one has been created from the nested group tree (6 levels) by selecting the top most group of the nested group.
If the screenshots indeed show the open Smart Objects the Layer Masks in »B. nested group.psb« seem to have been changed in comparison to »Layer 3.psb«.
Copy link to clipboard
Copied


 AdChoices