 Adobe Community
- Home
- Photoshop ecosystem
- Discussions
- How can I recreate this texture with Photoshop
- How can I recreate this texture with Photoshop

Copy link to clipboard
Copied
Hi,
I'm wondering if I can recreate something similar to this texture with Photoshop:

What would be a good way of doing this?
If I can't do it with Photoshop, with what program can I do it?


 1 Correct answer

Hi
Try this - my scrolls are far from perfect but hopefully you get the idea.
1. Start with a square - I used 1024 x 1024.

2. Draw on some scrolls - avoiding the edges and using a soft brush with spacing set to minimum (1%)
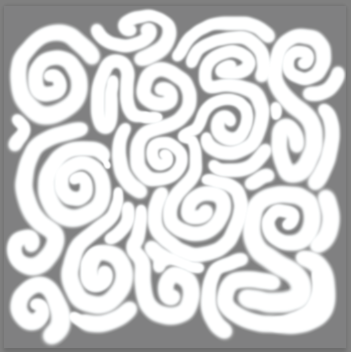
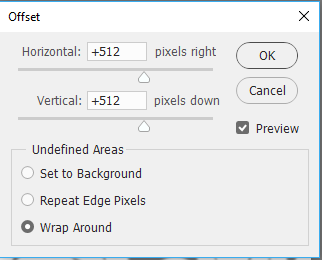
3. Use Filter - Other Offset - set to half the width and height (in my case 512px and check wrap around)

4. Extend/add scrolls to cover the mid section without touching the outer edges

5. Add a curves layer set so output values are between 128 and 135 - this will keep the depth of
...Explore related tutorials & articles
 8
Replies
8
8
Replies
8
Copy link to clipboard
Copied
Some programs call that a 2 1/2 D image. Which means not quite 2D and not quite 3D but somewhere in between. It is easy to do in a program that has such a feature like Zbrush.
However, if you look at the image clearly, you can see it has a highlight, a shadow and a path or shape. Therefore you could create a 2d shape then apply a depth map to make it raise. Generally with height maps or bump maps the middle height would be mid gray or 128r, 128b, 128g. and moving toward white or black would raise or lower the image which way depends on the program.
The shape it self can be done with just a paintbrush tool and create the strokes. Since it is repetitive, copy and paste could help you out in the speeding up the process.
Copy link to clipboard
Copied
Hi there,
Thanks for your response.
I wonder how he managed to perfectly imbricate those shapes (and their topology) without them overlapping each other.
Did he carefully draw the shapes apart, or is it part of an effect.
I'm trying to find a tutorial about Photoshop depth maps on youtube, but I'm not sure which one would serve my purpose.
Do you know of a good tutorial about this?
Thanks again
Copy link to clipboard
Copied
Hi
Try this - my scrolls are far from perfect but hopefully you get the idea.
1. Start with a square - I used 1024 x 1024.

2. Draw on some scrolls - avoiding the edges and using a soft brush with spacing set to minimum (1%)

3. Use Filter - Other Offset - set to half the width and height (in my case 512px and check wrap around)


4. Extend/add scrolls to cover the mid section without touching the outer edges

5. Add a curves layer set so output values are between 128 and 135 - this will keep the depth of the map low


6. Make the curves and scroll layer into a smart object and add a slight gaussian blur ( I used 9 pixels)

7. Go to 3d and make Mesh from 3D depth map

8. Adjust the camera so the "peak" edges just touch the edge of the frame (don't worry about the tiny gaps) and adjust the light to give the shadows you want

9 Render the 3D layer

10. Add a new empty layer and Merge Visible - you now have a tile on a single layer but those tiny gaps at the edges will stop it if used as a pattern so :
Use Filter Other Offset to move it 512 pixels

11. Use a brush and clone tool to fill those gaps and you will have a scroll texture that will tile

I hope that helps to get you started
Dave
Copy link to clipboard
Copied
Hi,
Thanks very much for your detailed answer.
The result looks great and is exactly what I'm looking for.
Will try this out later today!
Regards
Copy link to clipboard
Copied
Hi Dave,
I think I followed all your steps but got a different result after making the mesh from the depth map (attached below)
What do you think is causing these "steps"?

Copy link to clipboard
Copied
This is probably bit depth, and it looks like you prepared your image in 8 bit mode. If you did and used the values in my example then after setting the curve, you are only using 6-8 steps between low and high. I was working in 16 bit so when I set the curvethe same way , I still had lots of real steps between the 8 bit values of 128-255.
Dave

Copy link to clipboard
Copied
Nice work davescm,
maybe you should just share the PSD with Alexx0186 so he can dissect it and use it? Seems like you both have invested enough time onto this one?
Just a thought, I know you learn by doing. Regards
Copy link to clipboard
Copied
Hi there,
Thanks for your response.
No need to share the file as it was indeed an 8-bit image I was using.
Alex

 AdChoices