 Adobe Community
Jewelry photo help

Copy link to clipboard
Copied
I need to clean this somehow, the back of the ring is a mess and I would like to have some ideas how to fix it...to look professional

and this is what I did, I am not happy with it 


Explore related tutorials & articles
 9
Replies
9
9
Replies
9

Copy link to clipboard
Copied
Did you take the picture? If so, think about taking it again. Jewelry can be difficult to Photograph because it is so reflective, but it is doable even using just a DSLR and camera mounted speed-light. The trick is to direct the flash at a large sheet of foam board or similar, which is above and behind the jewelry and angled to reflect the light back to the jewelry. The flash needs to be flagged so that no direct light hits the jewelry.
I also placed another piece of foam board this side of the bracelet shot below. This was taken at a lighting workshop I ran several years ago, to demonstrate that you can do this stuff without a lot of expensive gear.

You have a particular issue with the ring in that it has a surface square on to the lens axis, and it looks like you had the camera quite close to the ring making for the large reflection of the front of the lens. Using a long focal length macro lens would get you further away, but another thing to consider is that do not need the entire lens area if stopped well down. I used the arrangement below for a tricky shot of a highly reflective beer 'Growler', but still had an issue with the lens being reflected. I reduced the issue by shooting at F22 and placing a sheet of white paper with a small hole in front of the lens. I still had a ting repair to make, but much easier than without the sheet of paper.
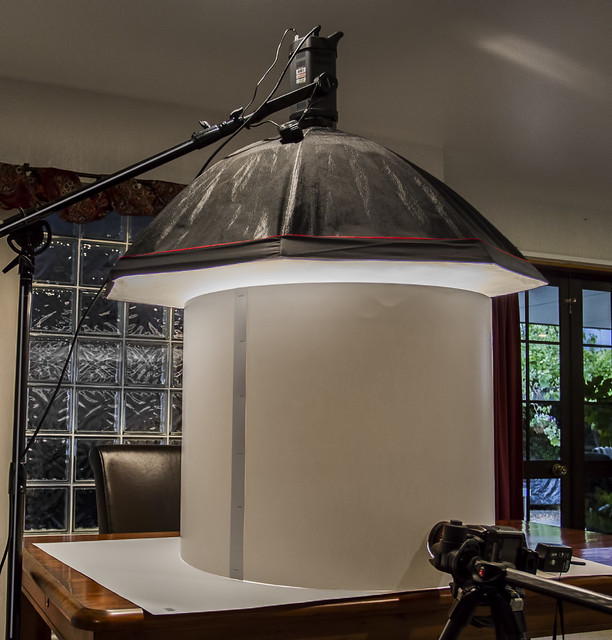
[EDIT] I should probably add that I was unable to use a light tent for the growler as it was so reflective, it was clearly showing the corners of the tent.

Copy link to clipboard
Copied
If you can't take it again you could try something like this, a bit quick and dirty but hopefully you get the idea:
Mask the back and paint in the gold with a brush - Use Alt-Click to pick up the colour
I added an extra layer to give some luminosity variation
Then unmask the lettering
A few highlights to finish


Dave
Copy link to clipboard
Copied
Can you explain more about about luminosity layer....is it same color just turned to luminosity?
And also how did you do highlights? Just white soft brush with 5% opacity?
Please explain more
Copy link to clipboard
Copied
I am not sure of the context in which Dave used Luminosity, but if it was to do with Adjustment layers, then setting the blend mode to Luminosity means that a Curves layer, for instance, will only affect brightness, and not colour, as it otherwise tends to do. Highlights are usually made by stroking a path made with the Pen tool, and then blurring the stroke, as below.
This is pure illustration other than the inlaid jeweled section at the front, with the gold texture created with my favourite plugin Alien Skin Eye Candy 7. The hallmarks are obviously completely genuine, and refer to Royal Sheriff gold. 

Copy link to clipboard
Copied
Hi
You asked about the luminosity layer.
After painting the back with gold colours sampled from the ring it looked a bit flat. So I put another layer above it and clipped (Alt click the border in the layers panel) it to the painted layer. I set this new layer to luminosity blending mode. Then I just used a soft, low opacity, brush in black and white to add some variation in shading without changing the colour.
Yes the highlights were just a small soft brush with a colour sampled from an existing highlight
I hope that helps
Dave

Copy link to clipboard
Copied
Jason,
I know it has been almost a year since you posted this but wanted to know if you still needed any suggestions. The other suggestions were good but really didn't have anything to do with which tools in Photoshop would help fix it. If it is ok with you, I would like to download your first photo, make the necessary fixes I think would help, and then show you the Tools I used and how to use them.
I have an eCommerce site where I primarily sell jewelry. Gold isn't as difficult as silver to photograph but with being the chief photographer, graphic artist, customer service rep, inventory control manager, web designer, shipping clerk, inventory forecaster, and technical writer, I don't have time to keep setting up a photo studio every time a pic doesn't turn out well, so learning how to use the Tools available in Photoshop or Lightroom has helped become more efficient. Just let me know if you're open to working on your pic.
Erin
Copy link to clipboard
Copied
Sullibury wrote
Jason,
The other suggestions ......... really didn't have anything to do with which tools in Photoshop would help fix it. ...........
I wonder what posts 2 & 5 were then .....
The whole idea of this forum is to share methods - so feel free to post your technique and results
Dave
Copy link to clipboard
Copied
My bad! I just saw the ones on photography. Sorry for my confusion but it looks like #2 was a great option and which I will start using more (luminosity).
Take care,
Erin
Copy link to clipboard
Copied
No worries ☺
Seriously, if you have good alternatives post them here. There are always several ways to tackle a problem image.
Dave

 AdChoices