 Adobe Community
realistic montage

Copy link to clipboard
Copied
 _.png)
Hello,
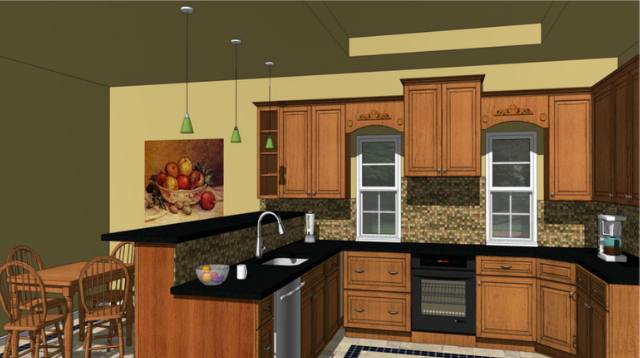
Please i've been working this piece for some time.
The photo is real and high quality.
But feedback from boss was to make it 'LOOK MORE REAL, IT LOOKS 3D'
Give me some tips pls, thanks


Explore related tutorials & articles
 10
Replies
10
10
Replies
10

Copy link to clipboard
Copied
- shadows and lighting are all all wrong
- perspective is completely incorrect
- reflections gradients look fake (like simple gradients)
Copy link to clipboard
Copied
How do i improve?
Copy link to clipboard
Copied
Can't you see the problems with perspective in your piece? If not, you will have to read up on how to render/draw elements in perspective - that is too much to explain here. For starters, your kitchen block seems to float on top of the background. The bottom corners of the kitchen block ought to be placed/aligned with the room's corners - against the walls.
As for the shadows, you applied dark "ambient occlusion" shadows around your kitchen and in the room's corners, which is far too strong. That is not how "real" shadows work. Again, grab a good book that explains about lighting and shadows - for example, "Color and Light" by Gurney.
There are other issues in how you render the materials. I wonder, you say you used a real photo somewhere in this piece? If so, your additions and tinkering have turned it into a less "real" result.
Copy link to clipboard
Copied
Another option is to model and render elements in a 3d app, and use Photoshop to composite those into the photo. But you would have to know how to work with a 3d application.
Copy link to clipboard
Copied
Does a graphic designer have to do this or should i have other ppl in my team? I work alone.
Copy link to clipboard
Copied
I can't really answer that question for you, because it depends on a number of various factors. I know graphic designers who are capable of doing this type of work by themselves, and I know agencies that work with teams with members who have more specialized jobs (one for 3d work, one for illustration, one for branding, etc.).
It also depends on the job and the client.
I do know that if I lack the skills to achieve what I need for a client, I will either teach myself the skills (time allowing) and/or hire outside help (perhaps even to help me learning to do the same job while they work on it). But it also depends on the rates (pay) for the job at hand. And other circumstances as well.
So... short answer: it depends. You will have to answer that question yourself.

Copy link to clipboard
Copied
You say this is a photo that you have "worked on for some time". Can you post the original - unretouched photo. To be honest it looks like a composite of several where the perspective does not match. Look at the vanishing point of the room (roughly in the centre), the sink (off to the left) the hob (off to the right) We might be able to give you better advice if we could see what you started with.

Dave
Copy link to clipboard
Copied
I added the sink. stove.. The original only has the tall furniture and the main kitchen piece.
Copy link to clipboard
Copied
Hi
Go back to the composite and start with the perspectives. Get them to look right. I mentioned the sink and hob - but also look at the cooker hood - you should see some of the left side but not the right. Draw a line from the top of the tall cupboard - it does not match the room vanishing point - but it should. With a straight on shot like this it should be easy to mark up a common vanishing point and work from there.
If you are compositing photos then using a combination of perspective warp and the vanishing point filter will help - but you may still need to paint in a side if it was not in the original photo (e.g. the cooker hood)
Next up will be the lighting - think where is the light coming from and where will it cast shadows. It is OK to have more than one light, and to have large soft lighting, but think of each light (and therefore each shadow) in turn. The heavy shadow line at the bottom of the kick plate makes it look like the units are floating. At the moment you have a strong shadow under the wall cupboards suggesting a light above and to the left of them. But there is no light - just a tall cupboard which itself is lit from the right.

Copy link to clipboard
Copied
ishfaqbaijoo wrote
Hello,
Please i've been working this piece for some time.
The photo is real and high quality.
But feedback from boss was to make it 'LOOK MORE REAL, IT LOOKS 3D'
Give me some tips pls, thanks
 _.png)
Blimey, it's all over the place. You say this is a real photograph? What is real, and what focal length did you use? What did you add, and did you add it as a single unit, or bit by bit?
You have a lot of problems there. The vanishing point for the walls is about eye height, which is good, but the focal length is way too wide. If you match the furniture to the walls, it is going to look like an endless tunnel because of the extreme perspective. So I thought about matching the walls to the furniture, but the vanishing point for that is well above eye height, and would make the room look like it was photographed from above eye height, which wouldn't match the counter tops.
It still looks better with the room matched to the furniture though. The hob has been faked to match the same perspective below, but there is not enough detail in the sink to work with.

Have a look at SketchUp. It is free, easy to use, and you could mock this entire scene up in no time after some practice. The furniture is all downloadable for free from a massive online library. You can place the camera wherever you want by moving the mouse, and render out to a very decent 3D image. In fact you could make a video of the camera moving through your model of the entire building!
SketchUp for Kitchen Bath Interior Design | SketchUp

 AdChoices