 Adobe Community
- Home
- Lightroom Classic
- Discussions
- Using Spot removal tool on a straight line LR6
- Using Spot removal tool on a straight line LR6

Copy link to clipboard
Copied
Hello, does anyone else have this issue?, I'm trying to clone a part of a straight line onto another small part but it changes the angle ever so slightly so it never matches up..


 1 Correct answer

Yes, using too large chunks is what many do wrong - I can see this in classes when I introduce the tool. Also make sure you are in repair mode. For the current sample posted here, the Feather was on 0 - IMHO, Feather is one of the keys of this tool which can decide to produce good results or garbage. For areas like the blue sky with no details but with gradient, i suggest to crank Feather up.
 27
Replies
27
27
Replies
27

Copy link to clipboard
Copied
I have found this particular use of the Lightroom clone tool to be unsatisfactory, I could never get results I was happy with.
Copy link to clipboard
Copied
Absolutely! Its not even that they have a curve, the lines are perfectly straight and parallel all the way through and if they are not then straightening transform tool is not doing it job neither. But when i show the gridlines to see how straight they are, from eye ther are perfectly straight. So i think it would be good for Adobe to give us an explination on this.
Copy link to clipboard
Copied
sadiep32877858 wrote
So i think it would be good for Adobe to give us an explination on this.
Honestly, I don't think Adobe explains these sorts of things. You are wasting your time trying to get an explanation from Adobe.
Copy link to clipboard
Copied
oh really?! Such a highend product with no answers to issues - makes perfect business sense!
Oh well, always worth a try I suppose..
I do have another question that you might be able to answer, depending on how you purchased your product... I have LR6 as a one off purchased product on its own, not within the creative cloud package - is there any tool differences within the creative cloud package than the the product on its own? Its just I hear alot about the de-hazing tool but I dont seem to have it on my software I have?
Copy link to clipboard
Copied
The clone tool is identical in LR 6 and LR CC 2015.
Dehaze only exists in LR CC 2015.1 or later. It does not exist in any version of LR 6.
Copy link to clipboard
Copied
To add on dj's response, here's some more information for you:
Compare Your Options: The Differences Between Lightroom 6 vs. CC | ProDesignTools
Compare Lightroom CC vs. versions 5 & 6 | Adobe Photoshop Lightroom CC history
Copy link to clipboard
Copied
Thank you

Copy link to clipboard
Copied
sadiep32877858 wrote
...So i think it would be good for Adobe to give us an explination on this.
Well, it is called a SPOT REMOVAL tool. It is designed to remove small spots. It is not a replacement for the Clone Stamp or Spot Healing Brush found in Photoshop.
Copy link to clipboard
Copied
Actually, the tool being used is the Lightroom Enhanced Spot Removal tool , which can replace one area of a photo with another area, whether it is a "spot" or something else ... but ... as I said, is completely unsatisfactory in this usage.
Copy link to clipboard
Copied
Funny enough, I personally never stumbled over this issue and the tool always worked as supposed.
Copy link to clipboard
Copied
I didn't have this issue in LR5, in most cases it seemed to line up perfectly unless there was a kink or converge. It just seems to tilt it ever so slightly. Even if I drew a perfectly straight line you could see a slight difference in the white outline of the selection itself.
Copy link to clipboard
Copied
https://forums.adobe.com/people/F.+McLion wrote
Funny enough, I personally never stumbled over this issue and the tool always worked as supposed.
How would you use this tool in this situation to avoid the problems that the original poster is having?
Copy link to clipboard
Copied
Sorry for the delay in responding ... just a (too) busy week 
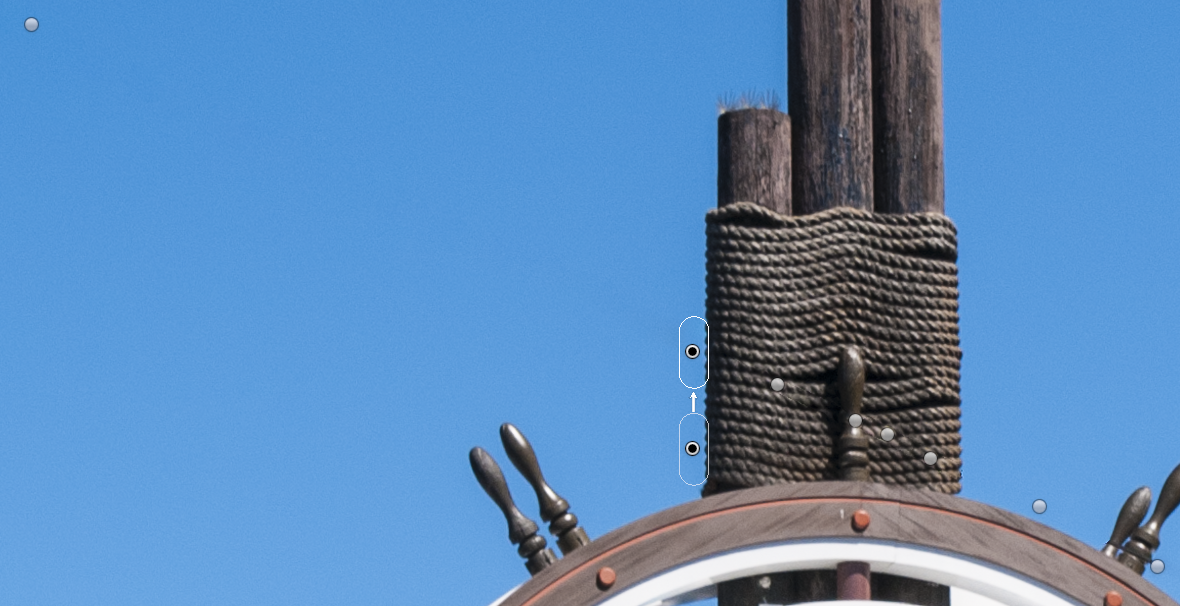
What should I say ... I just did never before see this issue and can only post a sample of what's possible ... I know you all already know 


I'm not claiming this to be perfect, just some quick 'repairs'.
Copy link to clipboard
Copied
No, I don't know you could do this, whenever I try to remove lines or whatever using Lightroom, I get garbage that isn't usable. So please tell us how you did this, in detail.

Copy link to clipboard
Copied
I too have been getting good results like F. McLion. I recreated what he did on his uploaded photo with just as good results. I think the key a lot of times is to use the brush in small pieces instead of large chunks and a lot of careful relocation of the source area.

Copy link to clipboard
Copied
Yes, using too large chunks is what many do wrong - I can see this in classes when I introduce the tool. Also make sure you are in repair mode. For the current sample posted here, the Feather was on 0 - IMHO, Feather is one of the keys of this tool which can decide to produce good results or garbage. For areas like the blue sky with no details but with gradient, i suggest to crank Feather up.

Copy link to clipboard
Copied
This is an example where the sky is almost monochrome blue, so I will see if I have such a photo and give it a try. I also have not seen an example where the sky is a gradient of blue, possibly where there are occasional clouds, where this technique works.
Copy link to clipboard
Copied
Joekostoss
Actually it's much more than just a spot removal tool...granted it has its limitations and no where near as powerful as Photoshop I should imagine, BUT thank you for the CLARIFICATION!
Copy link to clipboard
Copied
Did you try and move the SOURCE to a different area of the photo and see if it aligns better. I have had pretty good luck with the tool but in situations like this the source and destination have to have the same alignment because the tool does not rotate the selection.

Copy link to clipboard
Copied
sadiep32877858 wrote
Hello, does anyone else have this issue?, I'm trying to clone a part of a straight line onto another small part but it changes the angle ever so slightly so it never matches up..

It's hard to tell from the small crop provided, but my guess is that the image has converging verticals, such as in the below picture:

The image "changes size" in the vertical orientation, which prevents the clone spot areas from aligning properly. This can be fixed by using the Vertical, Auto, Guided, or Full tools in the Transform panel to make the verticals parallel. Here's the above image using the new Guided Upright tool:

Copy link to clipboard
Copied
Please share your image and post the link to download it here.
Copy link to clipboard
Copied
trshaner I also too thought it was because of converging lines as in the original image they were but I fixed that problem before I started with the spot removal tool. I also checked it with the guidelines after fixing and from eye they seemed perfectly vertically straight but the selected area seemed to twist diagonally ever so slightly, just enough to chuck the whole thing out of line. So my guess would be that maybe the selection area is maybe selecting from the original image rather than after it has been straightened. I noticed something else too but I will show you when I have a moment to reload that particular image back onto my computer. I will load a larger screen shot area for you.
Copy link to clipboard
Copied
OK, the original image file had converging verticals, but you corrected them before applying the Spot Removal Clone tool.
I think I know what's happening. The Clone Tool uses the original image data bit map (Before state) and not the Transform bit map (After State). Try exporting the original file with the corrected verticals, but without Spot Removal applied. Use the below Export module settings to insure best results:

Then try applying the Spot Removal tool to the full-size TIFF image file.
Copy link to clipboard
Copied
That would be an explanation. However, I have a hard time to believe that such a bug was left undiscovered .... 
-
- 1
- 2

 AdChoices