• Global community
    • Language:
      • Deutsch
      • English
      • Español
      • Français
      • Português
  • 日本語コミュニティ
    Dedicated community for Japanese speakers
  • 한국 커뮤니티
    Dedicated community for Korean speakers
Exit
0

Changing a black silhouette I made from a photo to a specific Text color in CC 2017

Participant ,
Jul 20, 2017 Jul 20, 2017

Copy link to clipboard

Copied

Using Photoshop CC 2017 > Hello!  I'm trying to colorize a nice silhouette I made from a photo.  I need to match color of some text that the client fell in love with.  Just using Hue and Saturation adjustment can get kind of close - but how can I dial in exactly the colors I have numbers for with the text ? Here are some screenshots of how I have driven myself loco and hungry.  Thank you for any and all help!!!

Tree Trunk made into silhouette.pngTree Trunk made into color with Hue:Saturation.png

Text Colors I would like to match perfectly.png

Thank you thank yo thank you for any and all help!!!

Views

5.1K

Translate

Translate

Report

Report
Community guidelines
Be kind and respectful, give credit to the original source of content, and search for duplicates before posting. Learn more
community guidelines

correct answers 1 Correct answer

Community Expert , Jul 21, 2017 Jul 21, 2017

Quick way

Go to menu Layer - New Fill layer - Solid color to add a color fill layer above your tree trunk

Set the color fill to the required green (use the eye dropper)

Alt click on the border between the layers - so the color fill layer clips to the tree trunk layer

Dave

Votes

Translate

Translate
Adobe
Community Expert ,
Jul 20, 2017 Jul 20, 2017

Copy link to clipboard

Copied

I don't see why you couldn't just use the Eyedropper tool to click on the text. Then check the Color panel for the RGB color numbers.

Votes

Translate

Translate

Report

Report
Community guidelines
Be kind and respectful, give credit to the original source of content, and search for duplicates before posting. Learn more
community guidelines
Participant ,
Jul 21, 2017 Jul 21, 2017

Copy link to clipboard

Copied

Hi Barbara -

I do have the the RGB numbers,  But I can't seem to (or don't know how to) change the "tree trunk" silhouette of a palm tree I made black. I can have the tree trunk active but can't seem to change the color to the pin or green in the Text.  I have a png file of the "tree trunk" and a psd but can't figure it out.  Hue and saturation I can change the color but it's a guess and a bit off....

Thanks for any and all help and info......!

%22Black Tree Trunk%22.png

Votes

Translate

Translate

Report

Report
Community guidelines
Be kind and respectful, give credit to the original source of content, and search for duplicates before posting. Learn more
community guidelines
Participant ,
Jul 21, 2017 Jul 21, 2017

Copy link to clipboard

Copied

another note - I can see the eyedropper in Hue and saturation but can't activate it - even when I check "colorize"

Thank you Barbara for any and all help!

Garry

Votes

Translate

Translate

Report

Report
Community guidelines
Be kind and respectful, give credit to the original source of content, and search for duplicates before posting. Learn more
community guidelines
Community Expert ,
Jul 21, 2017 Jul 21, 2017

Copy link to clipboard

Copied

This is how I would suggest changing the color, and I would use the Photoshop file rather than the PNG.

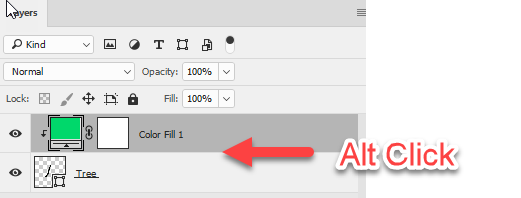
It looks like your image has a transparent background. I put a white layer underneath so that the screen captures will show up better.

If that is the case, all you have to do to select the black tree trunk is make a rough selection around the black trunk.

At the top of the Layers panel, click to lock transparency.

Make the color you want to use your active Foreground color. To do that you can click on it with the Eyedropper.

Choose Edit > Fill. For Contents choose Foreground Color.

Select > Deselect.

Let me know if this answers your question.

Votes

Translate

Translate

Report

Report
Community guidelines
Be kind and respectful, give credit to the original source of content, and search for duplicates before posting. Learn more
community guidelines
Participant ,
Jul 21, 2017 Jul 21, 2017

Copy link to clipboard

Copied

LATEST

Thank You Barbara!!!!!  I'm not sure why I went to PNG - maybe my marbles completely fell out!   This is perfect as well - thank you for the quick and saving tutorial!!!

Garry

Votes

Translate

Translate

Report

Report
Community guidelines
Be kind and respectful, give credit to the original source of content, and search for duplicates before posting. Learn more
community guidelines
Community Expert ,
Jul 21, 2017 Jul 21, 2017

Copy link to clipboard

Copied

Quick way

Go to menu Layer - New Fill layer - Solid color to add a color fill layer above your tree trunk

Set the color fill to the required green (use the eye dropper)

Alt click on the border between the layers - so the color fill layer clips to the tree trunk layer

Dave

Votes

Translate

Translate

Report

Report
Community guidelines
Be kind and respectful, give credit to the original source of content, and search for duplicates before posting. Learn more
community guidelines
Participant ,
Jul 21, 2017 Jul 21, 2017

Copy link to clipboard

Copied

Thanks Dave that was quick!  Now I can take a break and eat something!!!!  Thanks so much!!!!!!

Votes

Translate

Translate

Report

Report
Community guidelines
Be kind and respectful, give credit to the original source of content, and search for duplicates before posting. Learn more
community guidelines