 Adobe Community
- Home
- Photoshop ecosystem
- Discussions
- Pencil sketch in Illustrator or Photoshop? Where d...
- Pencil sketch in Illustrator or Photoshop? Where d...

Copy link to clipboard
Copied
Hello,
I have a question about getting into pencil sketches (primarily architecture). I want to learn how to do that.
1. Assuming I don't need a vector necessarily, should I do that in Photoshop (I've bought a few actions from graphicriver.com) or in Illustrator? I'm more comfortable with Illustrator, but the process seems to be easier to automate in Photoshop.
2. If the "verdict" is Photoshop, how do I go through the batch in order to understand the steps? Is there a tutorial or anything like that? The action I want to learn how to do is very nice, but also very complex. I think it has a few hundred steps. Is there a way to print out the steps? (without having to make screenshots). Many of the steps are just copying layers, but it still very complex.
3. If it's Illustrator (assuming I have the right brushes), would I have to go over every single line? (I'm not thinking about tracing, only about placing the picture and then reconstructing the lines).
I'm attaching the action I used and that I'd like to understand how it works.
Thanks a lot for reading this and maybe giving me an answer.


 1 Correct answer

If I understand you correctly you have an action that achieves roughly what you want and you want to see exactly what that action is doing?
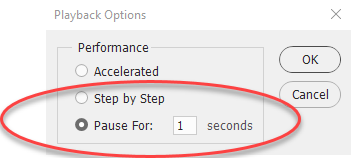
1. You can play it back slowly by going to the action panel options and under playback options select "Step by Step" or "Pause for x seconds" and watch it step through slowly
2. You can print out an action set
Hold down Ctrl+Alt (Cmd+Opt on Mac) whilst clicking on the action set folder in the actions panel. Keep Ctrl+Alt held and go the panel options and choo
Explore related tutorials & articles
 13
Replies
13
13
Replies
13
Copy link to clipboard
Copied
If I understand you correctly you have an action that achieves roughly what you want and you want to see exactly what that action is doing?
1. You can play it back slowly by going to the action panel options and under playback options select "Step by Step" or "Pause for x seconds" and watch it step through slowly

2. You can print out an action set
Hold down Ctrl+Alt (Cmd+Opt on Mac) whilst clicking on the action set folder in the actions panel. Keep Ctrl+Alt held and go the panel options and choose Save As. You will notice that this will give you a txt file rather than the usual .atn file to save. You can read that txt file in notepad


Dave
Copy link to clipboard
Copied
Thanks a lot, Dave, I really appreciate that you not only replied, but also you sent me some screenshots. So from your perspective, Photoshop is the way to go? Since it seems not I can see clearly all the steps.
Copy link to clipboard
Copied
I'll be honest - I am much more familiar and comfortable in Photoshop than in Illustrator. I use it far more due to my background in photography.
However, although we normally try and avoid double posts, in this case I would advise you to ask the third part of your question in the Illustrator forum, where it will be seen by more Illustrator users, and look at the responses from both to see what works best for you.
Dave
Copy link to clipboard
Copied
Thanks, Dave, makes sense. I'll ask the question on the Illustrator forum, too.
I appreciate your taking the time to answer.

Copy link to clipboard
Copied
I love the drawing. A lot of people use pencil and paper and scan into Photoshop to clean up the drawing.
That particular drawing is crying out for Vanishing point. Put down your perspective lines (on a new layer), and draw a vertical block. Then go into Vanishing point and clone that block as many times as you need to repeat it. You can obviously copy and flip a block for the other face, but if it does not have a symmetrical perspective, you can use Perspective Warp to adjust it. PW is a very hand tool for illustration, and useful for introducing artwork to composite into your scene that does not match the perspective.
I am not at home right now, and don't have Photoshop, but either I can demonstrate later, or Dave or someone can do so sooner. (Actually it is 2.30am where Dave lives, so I would hope he is not still sat in front of his computer).
Copy link to clipboard
Copied
Thank you for your answer, TrevorDennis.
I'm not good with drawing by hand.
But I'll look into Perspective Warp. It seems it's very useful in architecture.
What had in mind was to get a picture (like the picture of Equitable I was using in this case) and start form there. Given my bad drawing by hand, I don't think I'll be able to get good at it quickly without a picture underneath it.
Copy link to clipboard
Copied
OK, Photoshop is definitely the tool to use then. It has so many aids to help you like fractal noise generators (Render clouds, fibres, flames and even trees). Even using a photograph as a template, the Vanishing Point trick I mentioned would save you a heap of time, Perspective Warp is invaluable, but in the drawing at the top of this page, the two flanks of the building are symmetrical, so you wouldn't need it.
Using Photoshop for illustration can be very rewarding, and you don't necessarily need great drawing skills. Just knowledge of Photoshop technique. If you are keen to get into it, get yourself a Lynda.com subscription, and work through Bert Monroy's titles on Times Square and the Amsterdam Canal illustration. Every aspect is created entirely from scratch using Photoshop, but with help from Illustrator creating perspective lines, and developing where shadows should fall. It's fascinating stuff. I had the privilege of acting as a Teaching Assistant to Bert at Adobe Max last year, and its an experience I will treasure for the rest of my life. I produced this illustration of my wife using tools Bert taught in that workshop. Every pixel was produced with Photoshop using a photo as a template.
This is Bert's Times Square illustration. Keep zooming in to see the detail. I see there is a link to the Lynda.com tutorials on that page.
There are other tricks useful with B&W line drawings like using the brush set to Overlay mode. In Overlay mode, painting with black reinforces pixels darker than 50% grey, and white cleans up areas lighter than 50% grey. You'll no doubt know about using the Shift key to draw straight lines — mega useful for architectural drawings. If you are using Windows, also take a look at Lazy Nezumi Pro. It is an essential plug-in for all tablet users.
Mac Users have Hej Stylus, which does the line smoothing, but not the mass of other tricks that LNP can do for you.
Copy link to clipboard
Copied
Hi
Trevor mentioned a couple of tools that may be useful to you so a very quick demo with simple shapes.
Vanishing point :
1. I've used the shape tool to draw a simple rectangle shape :

2. Use Transform Path - Perspective to reduce left side

3. I repeated with a second rectangle

4. I added a "window" shape outside of the others.

5. I added a new layer then went into Filter Vanishing point and added 3 planes. The first two matched the perspective of the shape I'd drawn (Ctrl+Drag makes a 90 degree turn in the plane. The third , I used the Angle adjustment to match the flat on Window.

6. Then I used copy, paste and move to copy the window - letting vanishing point take care of the perspective as I did so

You can carry on copying , moving and cloning then press OK. At the end switch of the flat window layer
The other that Trevor mentioned was the Perspective Warp Tool
1. This time start with two rectangles drawn with the shape tool

2. I added a window shape drawn with the same tool and duplicated it several times - each time moving it

3. I combined all the shape layers into a single smart object and opened Edit - Perspective Warp
With Layout selected in the options bar I added two layout rectangles over the "walls"

4. I then switched the tool to "Warp" and dragged the handles then click OK

Although these were simple shapes, the good thing about these tools is that they both work equally well on complex images , including photographs. You will note on the second I used smart objects , this allows me to go back and change things later by opening the smart object and drawing on the flat shapes
I hope that helps you
Dave
Copy link to clipboard
Copied
Thank you for replying again and for the multitude of great points.
I have a Lynda.com subscription. I'll take a look at Bert M's classes. I heard about him but never looked into his classes. Starting with Times Square then  . Lots of great techniques in that course, I just took a look at it.
The illustration of your wife is very nice, great job!
LNP is a very fine tool, it seems. I have Astute (for Illustrator) but I''ll take a look at this, too.
Thanks again for taking the time to give me a long answer. I really appreciate it.
I see you're also an engineer. Did this help you in your illustration?
Copy link to clipboard
Copied
Thank you, Dave, for the mini tutorial for both Vanishing Point and Perspective Warp. I haven't used either of them before (I used Photoshop so far primarily for cutting out pictures). Thank you for taking the time to put this together
Copy link to clipboard
Copied
You're welcome  .
.
Give the tools a try and shout out if you get stuck
Dave

Copy link to clipboard
Copied
It actually depends on what you want to sketch. I am looking this is one kind of building so if Adobe Photoshop hard for you, you can help online tool. There are many online tools doing a sketch for free. May be my suggestion help for you.
Copy link to clipboard
Copied
Thank you for your reply, Yusuf. I'd like to stick to Photoshop, even if it's hard. I don't want another tool. The Photoshop actions I was mentioning (graphic river) are doing the job. But I'd like to see how.

 AdChoices