 Adobe Community
- Home
- Photoshop ecosystem
- Discussions
- Recreating lost/clipped highlights.
- Recreating lost/clipped highlights.

Copy link to clipboard
Copied
I will post at the bottom of this description one of the images in cause.
Photo was shot RAW, and in post-processing even dragging the exposure compensation slider down to -2 (maximum), and the Highlight Recovery slider to the maximum (100) , I cannot fill the white space in the middle of the flames. There is obviously lost information in there due to to dynamic range of the scene. Please help. I'll link one of the pictures. I am looking either for a tutorial on how to fill the whites inside the flames manually and blend them somehow to look as realistic as posible, or perhaps a tutorial on how to use some flames taken from google images and use portions of them, to fill the fire and do it in such a matter that the whole thing blends in.
If any of you see other solutions as well, I am open to anything.
I will link a photo with some expanations on it, and a clean version.
Link to the clean-image: UJO_5938.jpg - Google Drive
I appreciate very much any suggestion and person that is willing to take their time to guide me. Thank you in advance.


 1 Correct answer

Hi
Sure I'll give more detail.
1. I opened the image
2. I used Layer - New Layer to add a new empty layer above the image
3. I used the pen tool set to path to draw a path along the white area. (This path is required for the Flames Filter to work)


4. I went to Filter > Render >Flame and adjusted the controls dialogue to get some flames that matched your image.
I used Flame type "5 Multiple Flames Various Angles and in Advanced used Flame Style Normal
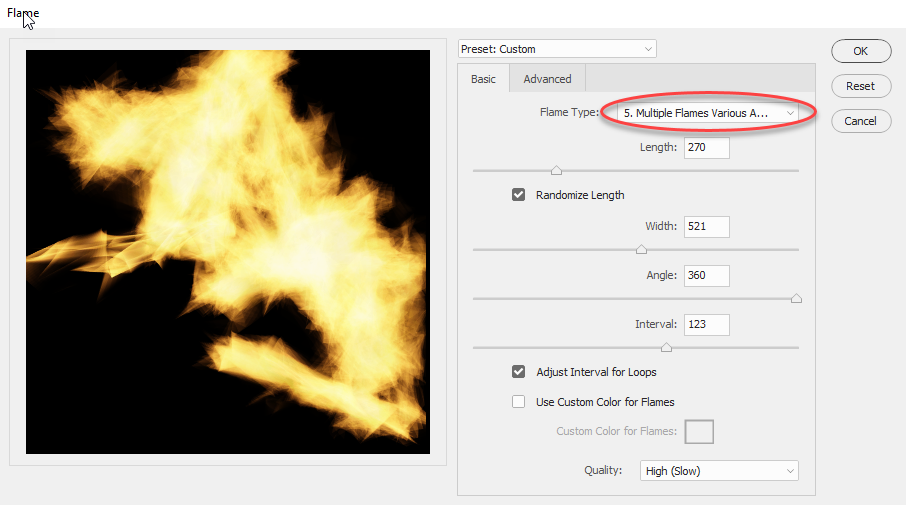

5. I clicked OK to render the frames to the layer.
6.
...Explore related tutorials & articles
 9
Replies
9
9
Replies
9
Copy link to clipboard
Copied
Hi
One possible way is to use the Render Flames filter on a new layer then use Blend If.
In the example below I also added a second flames render set to multiply blend mode.


Dave
Copy link to clipboard
Copied
Thanks Davescm. Could you perhaps be a bit more specific with the steps. A step by step tutorial would be helpful. I am moderately familiar with photoshop.
Copy link to clipboard
Copied
Hi
Sure I'll give more detail.
1. I opened the image
2. I used Layer - New Layer to add a new empty layer above the image
3. I used the pen tool set to path to draw a path along the white area. (This path is required for the Flames Filter to work)


4. I went to Filter > Render >Flame and adjusted the controls dialogue to get some flames that matched your image.
I used Flame type "5 Multiple Flames Various Angles and in Advanced used Flame Style Normal


5. I clicked OK to render the frames to the layer.
6. In the layers panel I right clicked on the layer then on Blending Options.
In the dialogue that appears I moved the Blend If "Underlying layer" black triangle to the right. Holding down the Alt key meant I could split the black triangle.
This means the new flames only appear in the brighter parts of the underlying layer

Then click OK
7. I added a another layer using Layer - New Layer
8. I used the pen tool to draw a new path
9. I used Filter > Render > Flame to create new flames but this time altered some of the sliders just to make the second layer different and set the advanced Flame style to violent
10 Finally I went to the layers panel and set that new layer blending mode to "Multiply"

That was it
Have a play around and shout out if you get stuck
Dave
Copy link to clipboard
Copied
That sir, is of true help. Hats off to you and thank you very much for taking all your time to explain.
Copy link to clipboard
Copied
You're welcome 
Dave

Copy link to clipboard
Copied
Dave, I love your answer. Folk still using old versions of Photoshop and saying that's all they need, can't getting involved with illustration, and creating content from scratch. Although, to be fair, I used to produce decent flames before we had CC Render > Flames. It'ts only a month or two till the next major update — I wonder what treats they have in store for us this time? We'll soon have to start looking out for the teasers.
Copy link to clipboard
Copied
Hey, they are already out there. This one looks genuinely useful
Copy link to clipboard
Copied
Cheers Trevor.
You are right. Some new features become daily essentials others (like Render Flame) are rarely used but very handy when they are needed.
Dave
Copy link to clipboard
Copied
If people are subscribed to ProDesignTools' newsletter, then they will have recieved an email about four hours ago as I type this which reminded us that CC 2017 was released on the first day of MAX last year. This year MAX kicks off on the 18th October, so just a month away. ProDesignTools are giving away a year’s free _full_subscription to Creative Cloud.
ProDesignTools: Adobe® Developments in Focus
Did anyone read any of Adobe CEO Shantanu Narayen’s 3Q report that went out this week? By heck it is some of the best ‘Management Speak’ I have seen in a while, with some outstanding phrases like ‘Adobe Sensei’. It also mentions Adobe’s third quarter revenue which is just shy of two billion dollars! I wonder how much of that comes from the Photoshop & Lightroom Photography plan, which I honestly believe is so reasonable, it persuaded a lot of people who previously used pirate software, to pay for r Photoshop? Apparently a large percentage of the nine million people who have a CC subscription, have the Photography plan, so it is not a stretch to think that Adobe should thank Scott Kelby for persuading them to introduce an affordable plan for casual users.

 AdChoices