• Global community
    • Language:
      • Deutsch
      • English
      • Español
      • Français
      • Português
  • 日本語コミュニティ
    Dedicated community for Japanese speakers
  • 한국 커뮤니티
    Dedicated community for Korean speakers
Exit
0

How do I acheieve this coloring effect on photos?

New Here ,
Sep 30, 2017 Sep 30, 2017

Copy link to clipboard

Copied

Screenshot_20170930-115954.png

How can I get this effect?

Views

358

Translate

Translate

Report

Report
Community guidelines
Be kind and respectful, give credit to the original source of content, and search for duplicates before posting. Learn more
community guidelines
Adobe
Advisor ,
Sep 30, 2017 Sep 30, 2017

Copy link to clipboard

Copied

Interesting effect.  I'd be interested to know how this is done too.

Votes

Translate

Translate

Report

Report
Community guidelines
Be kind and respectful, give credit to the original source of content, and search for duplicates before posting. Learn more
community guidelines
Community Expert ,
Sep 30, 2017 Sep 30, 2017

Copy link to clipboard

Copied

Maybe Highlight/Shadow adjustment?

Or maybe by using L*A*B* curves

Could be HDR toning also.

Votes

Translate

Translate

Report

Report
Community guidelines
Be kind and respectful, give credit to the original source of content, and search for duplicates before posting. Learn more
community guidelines
Community Expert ,
Sep 30, 2017 Sep 30, 2017

Copy link to clipboard

Copied

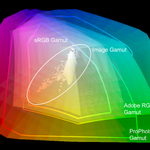
You can see that the black point is very loose with there being almost no content below RGB 50,50,50

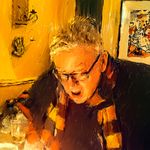
So starting with what Google thought a similar image

And using the Camera RAW filter (because it isa a one stop fix all)

Raised the black point all the way to the right

Moved Clarity part way to the let

Increased saturation and brightness for the blues

Moved De-Haze to the right (to add haze)

Boosted highlights and whites

You get this

Although I have absolutely no idea why anyone would want to, but that's art for you.

Votes

Translate

Translate

Report

Report
Community guidelines
Be kind and respectful, give credit to the original source of content, and search for duplicates before posting. Learn more
community guidelines
Community Expert ,
Oct 01, 2017 Oct 01, 2017

Copy link to clipboard

Copied

In addition to what's been discussed above, the original image has had Vibrance boosted way high. That's the reason for the surreal cyans taking over the image.

Other than that, yes, the shadows slider was certainly also opened up to 100%, and most likely Highlights to -100%, whic is reducing the overall contrast quite a bit and flattening the image somewhat.

Mike

Votes

Translate

Translate

Report

Report
Community guidelines
Be kind and respectful, give credit to the original source of content, and search for duplicates before posting. Learn more
community guidelines
Community Expert ,
Oct 01, 2017 Oct 01, 2017

Copy link to clipboard

Copied

This adjustment is quite easy. 

1-Curves layer taking shadows to about 50%.  then apply that layer in Luminosity blending mode

2.) Add a Hue/Saturation layer and adjust saturation to get the desired ammount of oversaturation

ICC programmer and developer, Photographer, artist and color management expert, Print standards and process expert.

Votes

Translate

Translate

Report

Report
Community guidelines
Be kind and respectful, give credit to the original source of content, and search for duplicates before posting. Learn more
community guidelines
Advisor ,
Oct 01, 2017 Oct 01, 2017

Copy link to clipboard

Copied

LATEST

Thanks for the explanations. Very helpful.

David

Votes

Translate

Translate

Report

Report
Community guidelines
Be kind and respectful, give credit to the original source of content, and search for duplicates before posting. Learn more
community guidelines