Copy link to clipboard
Copied
Hi there,
When I edit in Raw using Adobe Bridge, I was able to see the over-exposed area in RED. Then I will know these areas in red are over-exposed and I get use the slider to tone down the highlights and the red color dissappear.
But when I edit in raw using Lightroom 5, there are no areas shown in red. If fact the over-exposed areas are not shown in red.
How do I make Lightroom 5 show all these over-exposed areas in red ?
Thank you very much
Cheers
In Develop, click on the icon at the top right of the histogram (see image below) for highlight clipping.
You can also use the icon top left for shadow clipping.
Copy link to clipboard
Copied
In Develop, click on the icon at the top right of the histogram (see image below) for highlight clipping.
You can also use the icon top left for shadow clipping.
Copy link to clipboard
Copied
Thanks 99jon, mhoffman2001 and JimHess for the tips and solution ... you guys have been great ... cheers
Copy link to clipboard
Copied
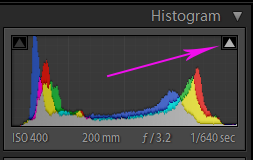
‌ The red highlights warning can be displayed by clicking the small triangle in the upper right corner of the histogram. This is a toggle that turns highlight warnings on and off. Similarly, the blue shadows warning can be enabled and disabled by clicking the triangle in the upper left corner of the histogram.
You can also show these warnings temporarily by simply hovering your cursor over the triangles; and you can see just the warning areas while you make adjustments by pressing Alt (Windows) or Opt (Mac) as you drag the sliders. Exposure, White, and Highlights warnings will show as red on a white background, while shadows warnings are shown as blue on black background.
The Alt-drag of sliders is als useful in that you can see color channel clipping as well.
Mike
Copy link to clipboard
Copied
Or you can activate/deactivate both the highlight and the shadow clipping indicators simultaneously by pressing the J key.