 Adobe Community
- Home
- Photoshop ecosystem
- Discussions
- How to change the flow in the Dodge & Burn tool?
- How to change the flow in the Dodge & Burn tool?
How to change the flow in the Dodge & Burn tool?

Copy link to clipboard
Copied
I have been trying for hours to figure out how to change the brush flow when using the Dodge & Burn tools. I'm trying to slowly lighten and darken areas of an image, but my brush stokes continually lighten or darken/apply more paint as I pass over an area, even though I don't lift up the mouse. People keep saying the way to fix this is to "change the flow" but they don't say how to do it. There's no option like there is in the Brush tool, and I've changed the Brush tool's flow, but it doesn't affect D&B's flow. Is there a way to change the flow in Dodge and Burn?


Explore related tutorials & articles
 12
Replies
12
12
Replies
12

Copy link to clipboard
Copied
Look at the top where it says Range and Exposure.

Alt-Web Design & Publishing ~ Web : Print : Graphics : Media
Copy link to clipboard
Copied
Hi Nancy,
Yes, I've been utilizing those options. My exposure is set quite low (5%), because I'm trying lighten/darken incrementally. I understand the low exposure is what's causing the issue, but tutorials and other internet sources have said changing the flow will help that not happen, ie. not layer on more paint unless I unclick then click again.
Currently this is what's happening:
Left: Exposure 100%, Right: Exposure 10%. One brush stroke, haven't unclicked.

What I'm trying to do is get the left side's consistency, but lighter. Do you know a way to achieve that? (Maybe asking for a way to change the "flow" wasn't the right question?)
Copy link to clipboard
Copied
Color Burn and Dodge tools are not very precise. They are mainly for quicky touch ups. I think you'll have better results with masks and adjustment layers. But without seeing your image, it's all guesswork.
Alt-Web Design & Publishing ~ Web : Print : Graphics : Media
Copy link to clipboard
Copied
This is my image. I'm trying to lighten/darken parts of the blade and bring out the pattern. I've already done about 8 of these knives, and I've had success editing them using Dodge & Burn with low exposure. Just takes a bit of time and extra carefulness to avoid it being splotchy.
I just want to know if there's an easier way to use Dodge & Burn so that I can go over an area more than once while layering on the same amount of paint, but being at a low exposure. Otherwise, yeah, I'll give masks and adjustment layers and other techniques a go. Thanks for your help thus far.

Copy link to clipboard
Copied
Zoom in. Try using a small, soft round brush with hardness at 0.

Alt-Web Design & Publishing ~ Web : Print : Graphics : Media

Copy link to clipboard
Copied
lisainwonderland wrote:
This is my image. I'm trying to lighten/darken parts of the blade and bring out the pattern. I've already done about 8 of these knives, and I've had success editing them using Dodge & Burn with low exposure. Just takes a bit of time and extra carefulness to avoid it being splotchy.
I just want to know if there's an easier way to use Dodge & Burn so that I can go over an area more than once while layering on the same amount of paint, but being at a low exposure. Otherwise, yeah, I'll give masks and adjustment layers and other techniques a go. Thanks for your help thus far.

Lisa, (is that right?) from what I have seen of Damascus steel blades, they tend not to have strong contrast between the light and dark tones, but it is local contrast that you need to target, so a Curves layer might be better.

Selecting just the blade shows up the tonal range of the Damascus pattern so you can target it with the curve profile.

Then run a gradient up the blade in the curves layer mask, to even out the effect

BTW I'd hate to be asked to simulate that pattern just using Photoshop. With your knife I'd be inclined to photograph it again taking lots of care with angles, and using carefully placed dark and white cards to accentuate the pattern. Rather than light it directly, I'd light the white card placed above and behind the blade. Imagine that the blade is a mirror, and place the white card so that you would see it reflected in that mirror surface when viewed along the camera's lens axes.
Copy link to clipboard
Copied
Hi Trevor,
Thank you so much for all the information. I did end up taking some new photos, because the initial one wasn't the best to begin with. The problem with the blade is that it's also hammered, so the light reflects off in so many different ways, it's a pain in the ass to try and get a good photo while controlling the lighting. Still trying, using a light box, but I might have to switch to the white paper as the blade is quite long.
I'll definitely give your tips a go. I'm still using D&B, just trying to be careful with how many times I go over an area. But anything to improve my technique helps!
-Lisa
Copy link to clipboard
Copied
A light box will just make it look flat and boring. I took this bracelet photograph six years ago as a demonstration in a lighting workshop. The person who was making them had tried using a light tent and was not getting great results, so I showed how to do this with a camera mounted speedlite.
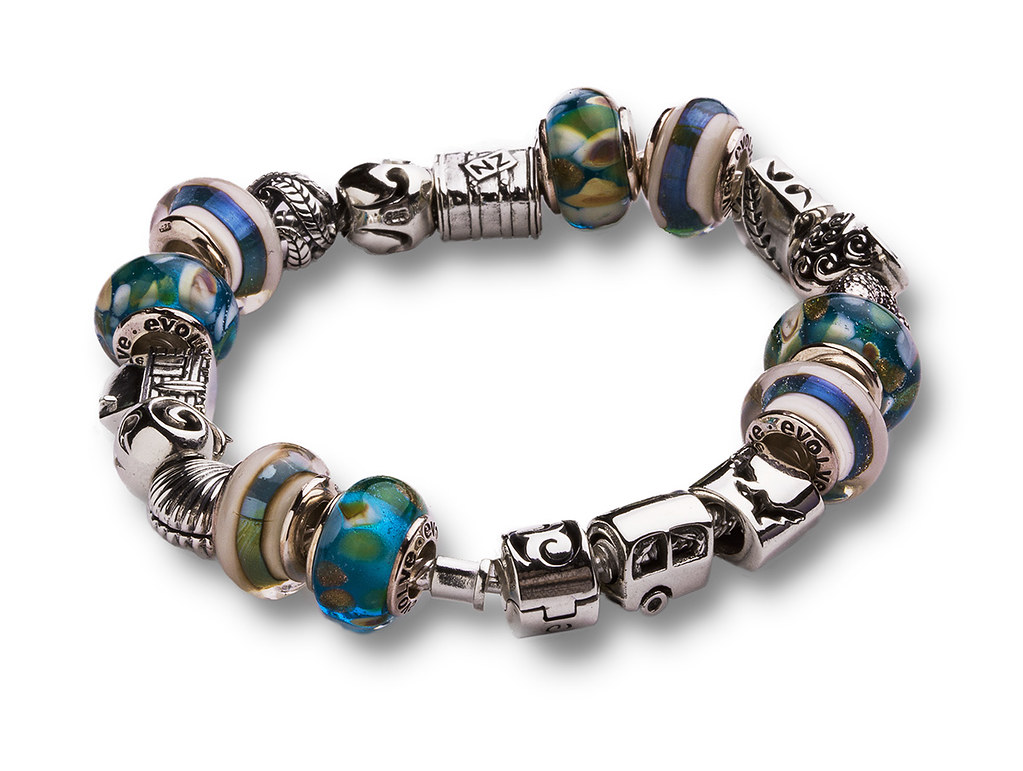
You might need to click to expand the illustration below. The flash head is tilted up so it is directed at the white foam board above and behind. The black flag (card) under the flash is important, as it prevents the flash lighting the product directly, so what you effectively have, is a large softbox behind and above the product.
Your knife blade is flat, so you would not need a large white area as was necessary to cover reflection from the curved bracelet. The additional black cards can be experimented with or left out, but the way to make things look metalic is to have areas of bright highlight and dark shadow. Go look at something made of chrome as an example. This is also an excellent way to light food, but you'd need a white reflector between camera and the product/food dish to give some fill.


Copy link to clipboard
Copied
If you use a black and white brush on a gray layer or a empty layer and set the opacity to to three to 5% and when you paint and do up your brush until the stroke is finished it will be consistant but you need to keep the flow at 100
Copy link to clipboard
Copied
Nancy OShea wrote:
Color Burn and Dodge tools are not very precise. They are mainly for quicky touch ups. I think you'll have better results with masks and adjustment layers. But without seeing your image, it's all guesswork.
Nancy I actually think they are underrated and unfairly maligned tools. People think they are being clever using 50% grey layers set to Overlay etc. but they are missing a trick. The ability to target tonal ranges, as you pointed out back up this thread, is incredibly useful when illustrating, or with skin touch up. Same thing with Protect Tones, however they can work against each other, so it is worth while spending some time practicing.
Note, there is the Airbrush icon in the Options bar with the Dodge & Burn tools. Clicking on either that icon or Build-up will cause the other to toggle — they are the same thing. The gotcha with that is Protect Tones nullifies the build up, so you need to turn it off to work. Note also that Opacity jitter is greyed out in Brush Presets > Transfer, but you can set Exposure jitter to Pen Pressure.

This sort of gradient is ideal for practicing and getting used to those tools. Try the same brush with all three tonal ranges, and with Protect tones on and off. The difference is dramatic. Incidentally, it was Bert Monroy who got me back into working this way, and I never use 50% grey/Overlay layers nowadays. Yes it is destructive, but a copied layer with mask takes care of that.


Copy link to clipboard
Copied
Can you explain a little bit more how exactly you work with D&B tools? Just working on emtpy transsparent layer or working on copied layer? And no any blending mode, just normal ?
Copy link to clipboard
Copied
Below is a tutorial on skin retouching with Dodge & Burn tools.
Hope that helps.
Alt-Web Design & Publishing ~ Web : Print : Graphics : Media

 AdChoices