• Global community
    • Language:
      • Deutsch
      • English
      • Español
      • Français
      • Português
  • 日本語コミュニティ
    Dedicated community for Japanese speakers
  • 한국 커뮤니티
    Dedicated community for Korean speakers
Exit
0

Changing contrast - cellphone scanned pencil drawing on brown paper bag.

Explorer ,
Jun 16, 2017 Jun 16, 2017

Copy link to clipboard

Copied

So, my great niece is required to draw a picture and tell a story as a school project (6 years old). So she draws it on a brown paper bag using a #2 pencil. Needless to say, it is very lacking in contrast due to the medium and writing implement. How can I punch up the pencil marks and decrease the paper bag color without losing much fidelity? I have the Creative Suite, so if this would work better in Lightroom I could do that too, but Photoshop seemed likely to give me the discreet control I need to make it work.I appreciate your time considering this.

KayLynn

Views

395

Translate

Translate

Report

Report
Community guidelines
Be kind and respectful, give credit to the original source of content, and search for duplicates before posting. Learn more
community guidelines

correct answers 1 Correct answer

Community Expert , Jun 16, 2017 Jun 16, 2017

You may choose to reshoot the image being careful to provide even lighting.

In the sample below the mode was changed to Lab and the L channel provided an opportunity to increase the pencil weight and lighten the brown color as seen here.  Then switch back to RGB Color

kid.jpg

bag.jpg

I started to lighten the dark area on the right, changed my mind and decided that it would be best to just reshoot with even lighting. It would allow you to provide even more contrast in the Lab Color L Channel.

Votes

Translate

Translate
Adobe
Community Expert ,
Jun 16, 2017 Jun 16, 2017

Copy link to clipboard

Copied

You may choose to reshoot the image being careful to provide even lighting.

In the sample below the mode was changed to Lab and the L channel provided an opportunity to increase the pencil weight and lighten the brown color as seen here.  Then switch back to RGB Color

kid.jpg

bag.jpg

I started to lighten the dark area on the right, changed my mind and decided that it would be best to just reshoot with even lighting. It would allow you to provide even more contrast in the Lab Color L Channel.

Votes

Translate

Translate

Report

Report
Community guidelines
Be kind and respectful, give credit to the original source of content, and search for duplicates before posting. Learn more
community guidelines
Explorer ,
Jun 17, 2017 Jun 17, 2017

Copy link to clipboard

Copied

Thank you, this is great. Reshooting, while not impossible is problematic. The picture was sent to me by a third party and I was going to surprise the mom with an improved version after she lamented the poor visibility for a family photo album. To reshoot it would be to spoil the surprise. Would it be possible to apply the L channel improvement to a lightening gradient applied left to right, lightening as it went ? In any event, thanks for that advice. I will work on applying it to my original picture.

Votes

Translate

Translate

Report

Report
Community guidelines
Be kind and respectful, give credit to the original source of content, and search for duplicates before posting. Learn more
community guidelines
Community Expert ,
Jun 17, 2017 Jun 17, 2017

Copy link to clipboard

Copied

You are on the right track, kjb.                

With Layers and the gradient as shown here, and a quick bit of touch-up dodging and burning this is a result.

layers.jpg

Story gradation.jpg

   But beware of the crocodile's shrp teth!

  Good luck

Votes

Translate

Translate

Report

Report
Community guidelines
Be kind and respectful, give credit to the original source of content, and search for duplicates before posting. Learn more
community guidelines
Community Expert ,
Jun 17, 2017 Jun 17, 2017

Copy link to clipboard

Copied

Slightly different approach to Norman. Nothing wrong with Norman's method but it's always nice to have alternatives.

First I looked for the channel with the most contrast (which was red) and used a channel mixer layer to turn the image grayscale based 100% on the red channel.

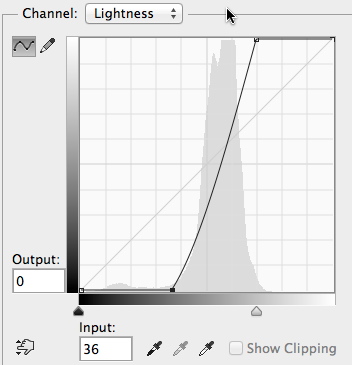
I added a curves layer to increase contrast and a second and third curve to even out the exposure in different areas.

Next I added color fill layers set to overlay mode 2 black and 2 white. These whitened white and blackened black but, by painting onto the mask, I could control what was blackened and what was whitened.

At the top - a final curve and a layer with the old edges painted white

Dave

Votes

Translate

Translate

Report

Report
Community guidelines
Be kind and respectful, give credit to the original source of content, and search for duplicates before posting. Learn more
community guidelines
Explorer ,
Jun 19, 2017 Jun 19, 2017

Copy link to clipboard

Copied

LATEST

Thank you. I'm going to practice that method on the original. However, the one that retained to paper bag is what will go into the album they are making. Really appreciate the time and thanks for a different methodology. You are right, the more ways you learn to do things, the more tools are at your fingertips the next time a problem arises.

Votes

Translate

Translate

Report

Report
Community guidelines
Be kind and respectful, give credit to the original source of content, and search for duplicates before posting. Learn more
community guidelines