 Adobe Community

Copy link to clipboard
Copied
I want to over/under lap some ellipses to make it look like a chain. The ellipses are "extruded and beveled" with the 3D effect. I've tired the "eraser," "knife," "scissors", and "live paint bucket" tools and just about everything else. This is for a company logo, so it needs to be clean and... well perfect. I'm new to adobe, and have all the apps if I need. thank you in advance for the help.
Below is a screenshot of a part of the logo...


 1 Correct answer

Starting out the same.
Draw the rings, outline stroke, and use the Live Paint Bucket to color the areas to make them look overlapping.
Then Object > Live Paint > Expand. The Items are grouped.

Apply the 3D filter.

Object > Expand Appearance.

If you View > Outline, you will see all the shapes that result from expanding, and everything is grouped.
Then I used the Group Selection tool to select small shapes where they are supposed to overlap. After selecting the shape, cut it. Select the shape it should
...Explore related tutorials & articles
 22
Replies
22
22
Replies
22
Copy link to clipboard
Copied
This is one technique. It works the same, whether the rings are extruded or not.
Create the rings.

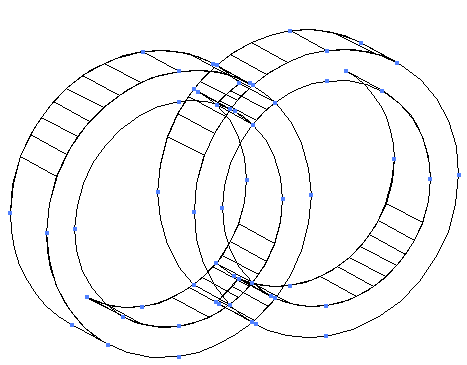
Select the rings and use the Scissors tool to cut them at each of their anchor points. Now each of the rings is divided into pieces. I've selected the lower left section of the blue ring.

Then Object > Arrange > Send to Back.

Copy link to clipboard
Copied
I will play around with this and tell you how it turns out... thank you.

Copy link to clipboard
Copied
Your welcome.
Copy link to clipboard
Copied
Another way would be to select the rings and choose Object > Path > Outline Stroke.
Double-click on the Live Paint tool in the Tools panel. Paint Fills should be checked. (its the default)

Select the rings.
Select the color you want for the overlap.

Click the area of overlap.


Copy link to clipboard
Copied
...I tired doing this originally but since its a 3D shape, it converts it back to 2D once its applied.
Copy link to clipboard
Copied
OK, then remove the 3D effects. Do technique #2 Live Paint tool, select the objects and Object > Live Paint > Expand.
Ungroup the resulting shapes.
Select the 3 pieces of the ring.

Pathfinder > Unite.

Select pieces of the other ring, and Pathfinder > Unite.

I've pulled the rings apart so you can see what they look like after uniting.

Now apply the 3D effect.
The openings probably won't line up perfectly, unless you used Font for the effect.

So you can manually fudge it by using the Direct Selection tool to position the points.

Copy link to clipboard
Copied
Hi Brooke,
I think that it is related continuing lines as a chain in order to do this appearance. first, draw a gradient line as below image -1-. then make it expend (under the object menu) after that drag and drop this object into Brushes panel and chose model as Art Brush. in the second section apply this brush on the shape -2- below. then using by pen tool add point on the intersecting parts and separate them using scissors tool to take under or top. I hope it works.

Copy link to clipboard
Copied
I worked a little more, and came up with this without having to 'fudge':

Will explain soon.

Copy link to clipboard
Copied
Here's a video tutorial that explains several ways of accomplishing "interlocking rings:" http://www.jeffwitchel.net/2012/12/the-magic-of-interlocking-rings/
Copy link to clipboard
Copied
Starting out the same.
Draw the rings, outline stroke, and use the Live Paint Bucket to color the areas to make them look overlapping.
Then Object > Live Paint > Expand. The Items are grouped.

Apply the 3D filter.

Object > Expand Appearance.

If you View > Outline, you will see all the shapes that result from expanding, and everything is grouped.

Then I used the Group Selection tool to select small shapes where they are supposed to overlap. After selecting the shape, cut it. Select the shape it should go on top of and Edit > Paste in Front.
This last step was the tricky part because you have to be careful which shape is being selected. I found that it helped to sometimes View > Outline, and sometimes I had to lock a section so it wouldn't get in the way. Then finally ended with this:
Copy link to clipboard
Copied
Not quite sure why you're extruding the shapes. They look like Gradients on Strokes which is a lot easier. Using gradients, the first method in my video works perfectly for this problem. You'll have to apply gradients to your strokes and in the Gradient panel make sure to apply the gradient across the stroke in the Stroke section of the panel. See attached screenshot.

Copy link to clipboard
Copied
Hi Jeff,
I'm trying to do the gradient but every time I apply it to the rings it it turns out like this...(linear, radial) 

also when I try to do the live paint with the gradient I gets upset. Would you be willing to show me how you made these with the right gradient...

Thank you very much.
Copy link to clipboard
Copied
You need to go to the Gradient panel to make sure the gradient is applied Across the Stroke. See screenshot below.
I don't think there's a good way to use the Live Paint option from my video when using gradients.

Copy link to clipboard
Copied
Very cool Barbara!
Copy link to clipboard
Copied
Thanks. I agree that it would be much simpler without the 3D effect!
Copy link to clipboard
Copied
I must be doing something wrong when I try to do the live paint, it simply just does not want to do the tiny piece I need it too. So...when you drew the circles did you just use the ellipse tool and use that one line that it produced (what I used) or did you use the ellipse tool and make one shape, then a smaller one and fill in the space between? or neither
Copy link to clipboard
Copied
I used the Ellipse tool to draw the circles. I have no fill color and a large stroke weight on each circle.
Then select the circles and choose Object > Path > Outline Stroke. That converts the strokes into filled closed shapes.
Outline view before outlining strokes:
Outline view after outlining strokes:
Double-click on the Live Paint tool in the Tools panel. You're settings should look like this -- check mark on fills and no check mark on stroke.

Then select the color you want and click the small area that needs to be recolored. If it's difficult to get that area, zoom in for more accuracy.


Let me know if this works for you.
Copy link to clipboard
Copied
Thank you Barbra for all your help. I'm going to keep trying all these tips and I'll show you the finished product soon.
Copy link to clipboard
Copied
You're welcome. If you get stuck on a step, let me know so that I can give more detail.
Copy link to clipboard
Copied
I suppose it would be easier to do the last part if you ungroup all the objects, but I didn't want to accidentally get one of the small pieces out of place.
The small shapes overlap one another so sometimes you need to click on the edge that doesn't overlap in order to select it.

Copy link to clipboard
Copied
Brooke,
The chain paths in the form of ellipses and heart (with highlight at the top regardless of direction) are fundamentally different from paths with gradients across (with highlight at the centre).
To reproduce them faithfully with the chain effect, you may choose (some of) those behind the others, such as the heart, and create copies of them at the very top of the stacking order, then turn the copies solid white, then cut them at suitable places and only keep the bits that are in front of the parts of the other chain paths you wish to hide, then in each case select both bit and path and in the Transparency palette flyout click Make Opacity Mask with Clip unticked and Invert Mask ticked.
That should give the chain effect and retain the right highlighting.
Was this woolly and unintelligible enough?
Copy link to clipboard
Copied
I think you'd need to clarify the 'look' that you want -- if you want the 3D look or the gradient look.
If you want the gradient look, here's another take on it.
Start with circles, stroke and no fill.

Select them and Object > Path > Outline Stroke.
Pathfinder > Divide.

Object > Ungroup until there are no more groups.
Select the small piece where it overlaps and change the color.


Select the 3 pieces that make up one of the rings.

Pathfinder > Unite.

Repeat for the other rings.

Give each ring a gradient fill. You'll need to adjust the sliders on the gradient so that they fall in the right place. Note how they are shoved over to the right edge.


 AdChoices