 Adobe Community
- Home
- Photoshop ecosystem
- Discussions
- Photoshop Making a Mess of RAW photos
- Photoshop Making a Mess of RAW photos
Copy link to clipboard
Copied
Hello!
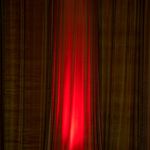
I've been using PS for years, but I'm fairly new to photography, and very new to shooting in RAW. I recently took some photos in a very low/red concert lighting situation. The original images obviously are not amazing, but they are, in fact crisp, and have a solid red color wash over the whole photo. However, when I import these photos into PS (CC 2019/MacOS High Sierra), they look pink (instead of red) slightly darker, much less sharp (almost as if a blur has been added), and all this without me touching a single PS Raw setting.
I had a long interaction with Adobe support today, where I allowed them access to my computer and they changed a bunch of settings and updated my Camera Raw software, but nothing has changed. They are now "escalating" it to a higher level support, which I should be hearing back from in the next 24-48 hours.
But is this normal? Is there something I'm missing? When I open the .NEF file in my mac preview software, it looks crisp and clear with perfect lighting and color. But as soon as I import it into PS it becomes a pink blurry mess. Surely this isn't normal.
Does anyone have any advice/suggestions?
Thank you,
CJ


 1 Correct answer

That preview is adding a graininess through excessive sharpening. If you want to do that for effect you can using the clarity control
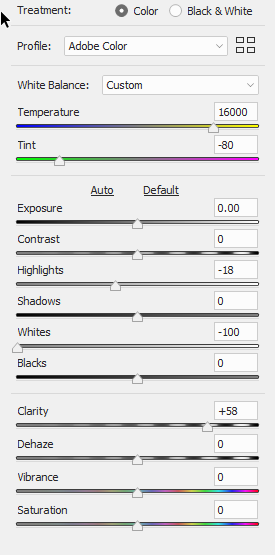

On the other hand you could choose to take it in a different direction altogether. That is the advantage of ACR - it's your choice not the camera's choice.
Dave
Explore related tutorials & articles
 8
Replies
8
8
Replies
8
Copy link to clipboard
Copied
Hi
When you look in a preview application - the preview is probably looking at a preview rendered in your camera and built into the RAW file.
Opening the RAW file in camera raw does not use that preview and gives you access to the full RAW image data. Those Camera Raw controls that have you have not touched are designed to be moved to get the picture you want.
The example you posted looks like different white balance and the preview has clamped the near black to total black which makes it look crisper but has in fact lost detail.
Can you post a link to an example raw file?
Dave
Copy link to clipboard
Copied
Here is an example. On the left is before PS, on the right is after PS
Screen Shot 2018-12-14 at 2.49.55 PM | Dazzling Vastness | Flickr
Copy link to clipboard
Copied
Hi
I can see the effect , as described above. If you want the look on the left then just move the controls, but you can probably do better than that.
Can you post a link to the raw file
Dave
Copy link to clipboard
Copied
Your initial reply made sense to me, so I did what you are now suggesting by adjusting a bunch of the controls and I definitely was able to make it look much better, but still haven't been able to achieve the sharpness of the original. PS seems to be adding a soft glow to the whole thing. Here is the original file:
Copy link to clipboard
Copied
That preview is adding a graininess through excessive sharpening. If you want to do that for effect you can using the clarity control


On the other hand you could choose to take it in a different direction altogether. That is the advantage of ACR - it's your choice not the camera's choice.
Dave
Copy link to clipboard
Copied
Very interesting. Thank you so much Dave! I really appreciate you taking the time for this clarification!
-CJ

Copy link to clipboard
Copied
So this is what ISO 12800 looks like on a DX sensor 
The first problem is that there is so much noise here that it takes completely over. It becomes almost like a halftone screen. On-screen resampling plays a big part here, and to compare you really need to view at 100%. Zooming out changes the whole image because of the resampling.
You absolutely cannot apply any sharpening here - but you also need to very careful with noise reduction. Since the whole image is nothing but noise, so to speak, any noise reduction will impact detail.
Here's 100% - you can see the problem.

I'd consider making a B&W version of this. Back in the '90s we worked hard for this grainy look in the darkroom. Kodak Tri-X 400 ISO, push-developed in Agfa Rodinal to 800 ISO, would produce a similar effect

Copy link to clipboard
Copied
I'd just like to add one more thing as a general comment for shooting in these conditions. You probably already know this and I don't know the circumstances here.
Get as close as possible and use the widest possible lens. My go to in these situations is 24mm on full-frame sensor. Then you can often reduce shutter speed to 1/30th second or thereabouts - and ISO down to 3200 or so. The noise increase with these extremely high ISO settings is exponential.

 AdChoices